Wednesday, October 3, 2018

A Game of Tag

I am not a big tag maker, even though I have seen so many gorgeous examples all over my various inspiration sites.  To be honest, for me it comes down to practically…what do I do with a tag?  So, I tend to keep my focus on cards, scrapbook pages and other paper crafted (useable) endeavors.   However, I was intrigued by Simon Says Stamps’ Monday Challenge to “Tag It”.  I ended up making a tag shaped card with a tag on it:
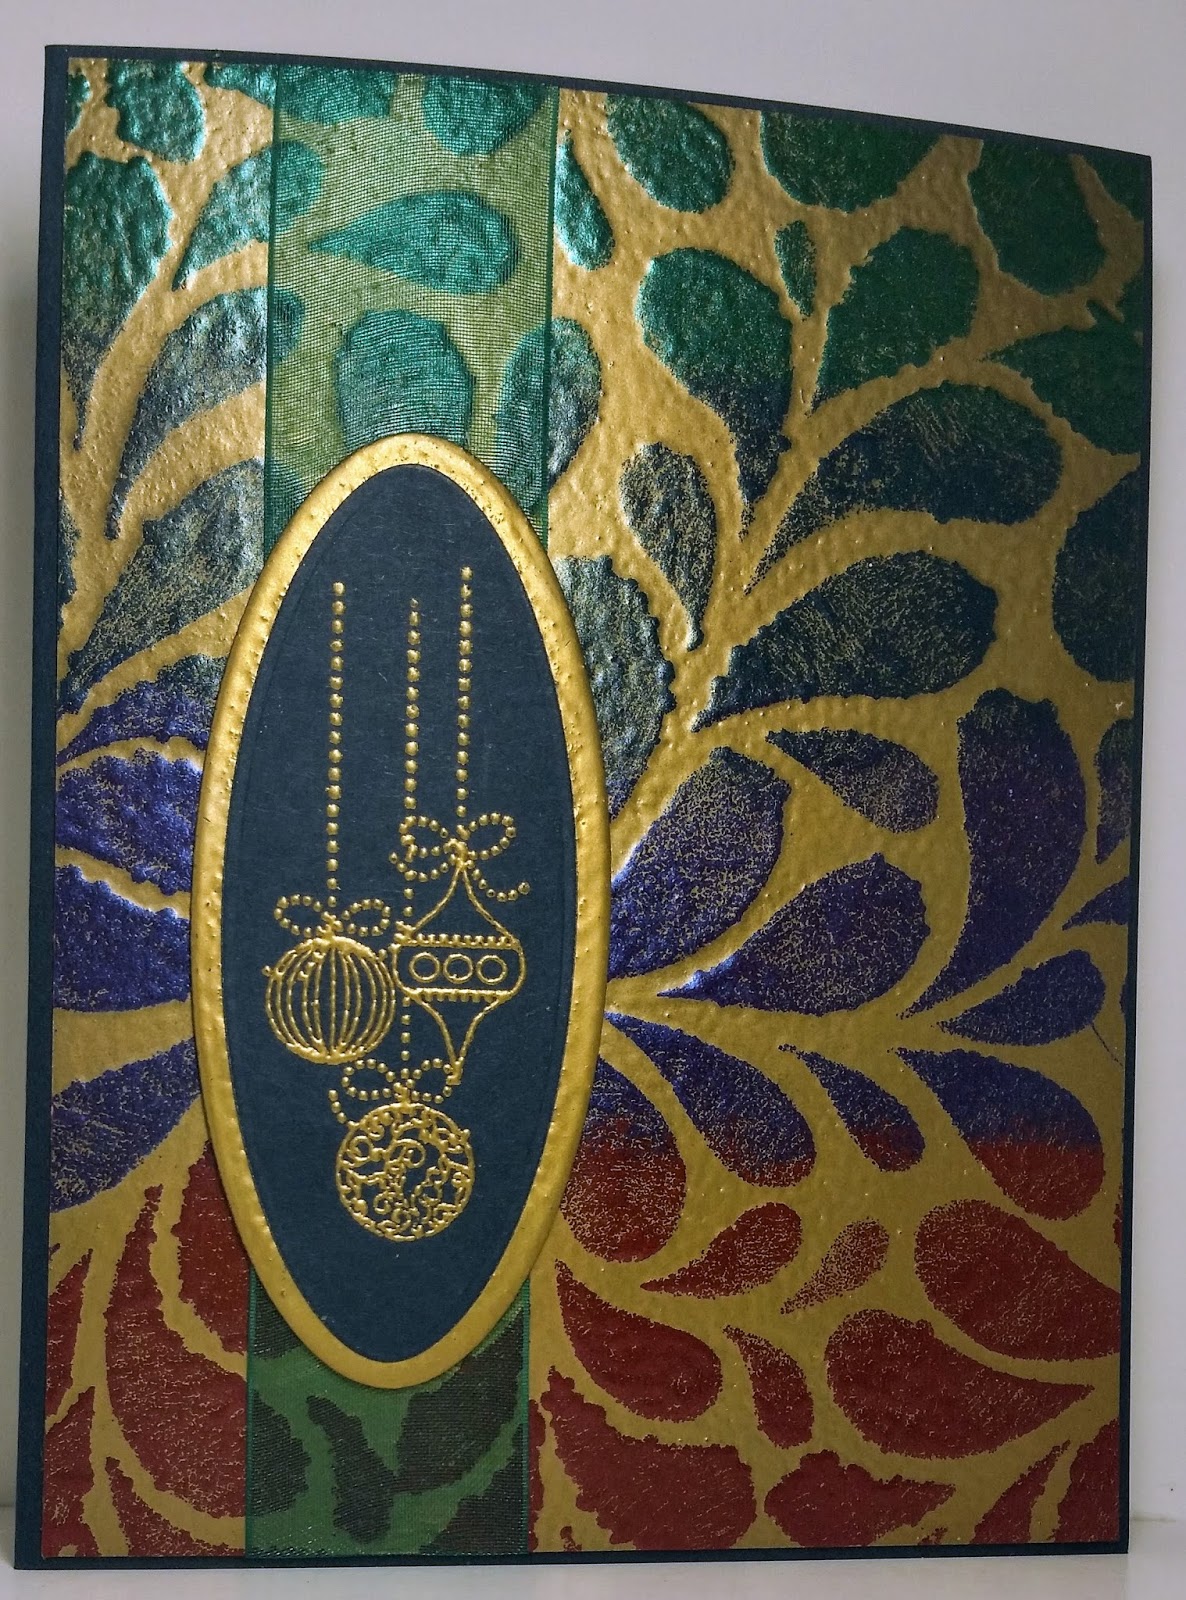
Both tags were cut using Tim Holtz “Tag Collection” dies.   For the base of the card I just trimmed a piece of folded cardstock and punched holes in all the layers.  The background was an experiment using shave cream and re-inkers through a Hero Arts Abstract Waves stencil.

To make the flowers, I first cut them out using the Tim Holtz “Tattered Florals” Bigz die.  Following a technique called Faux Embroidered Flower I learned from Technique Junkies, I used Majestic Purple and Peacock Liquid Pearls to cover them. 

Other supplies I used are:

**Paper from Club Scrap

**The sentiment stamp is from Club Scrap (Cherry Blossoms kit).  It is stamped with Onyx Black VersaFine ink and embossed with Silver Moon Turquoise powder from Lindy’s Stamp Gang.

**The ribbon is from Club Scrap (Artifacts kit).

To see more of my creations, you can follow me on Instagram at #inkyscraps.

Thanks for stopping by!

Sunday, September 23, 2018

Wedding Bling

Simon Says to “Bling It On” in their Wednesday Challenge.  What pairs better with bling than a wedding?  I made a wedding card to give to my daughter and soon-to-be son-in-law when they get married in a couple of weeks.  They are planning a (sort-of) pirate themed event with some nautical touches.   I didn’t want the card to be focused too closely on either theme, but it ended up having a nautical sort of feel:
First I stamped this stamp from Simon Says Stamps onto some gold paper using Midnight Blue StazOn ink.  Then I stamped it again onto several other papers with VersaMark Ink and embossed them all with Midnight Sapphire powder from Lindy’s Stamp Gang.  I fussy cut out each layer then stacked them up, using 3D Foam Squares behind the inner two navy layers (only because it will be hand delivered – I would skip this step if it was going through the mail).

The sentiment is cut out using a Lobster font with my Scan N Cut.   I cut it out twice with Navy paper and once with the gold then stacked them all up for some dimension.

For the bling I added some crystals from my stash (left overs from various other projects) and some gold nail heads from Mark Richards.

Other supplies I used are:

**Paper from Gina K. Designs (navy and silver background), handmade paper found at the Paper Source (silver layers) and part of a gold metallic envelope from Envelopes.com.

**The ribbons are both from Club Scrap.

To see more of my creations, you can follow me on Instagram at #inkyscraps. (But you won’t see this card there until after the wedding!)

Thanks for stopping by!

Thursday, September 20, 2018

Time is Sneaky!

It seems like just yesterday I received the wonderful news that my daughter is engaged.  Now, suddenly, we are just three weeks out from the wedding.   It is almost scary how fast time is flying by!   I made this birthday card for a friend with a stamp that articulates that thought perfectly:
I made this card to qualify for three different Club Scrap challenges:

1) 09/18 NBUS challenge which is to use a noise or background stamp.  I used a small one from the Down to Earth kit to create some texture behind the sentiment.

2) 09/18 Technique challenge “Inked Shadows” which is to use ink to create some depth.  I created a mask of the sentiment and used Sapphire ink to highlight it.

3) 09/18 Sketch Challenge which offers this sketch: 
I moved the sentient down and added an image, but otherwise I followed it pretty close.  Unusual for me!

The background is a technique I learned from this Gina K video.

Other supplies I used are:

**Paper from Club Scrap and Gina K. Designs.

** The sentiment stamp and the clock stamp are from Club Scrap’s “Time of Your Life” kit

**I used both Sapphire and Earth Hybrid Inks from Club Scrap.

**The sentiment is stamped with VersaMark ink and embossed with Chestnut powder from Zing.

**The clock was stamped with the Earth ink, embossed with Clear powder from WOW and fussy cut.

**The ribbons are both from Club Scrap (brown the Bookshelves” kit and the blue from the Serenity kit, altered with B93 Copic marker.)

**I colored in the edge of the clock stamp with Ground Espresso Distress marker.

**The nailheads are from my stash.

To see more of my creations, you can follow me on Instagram at #inkyscraps.

Thanks for stopping by!

Wednesday, September 12, 2018

Double the Stencil Fun

If asked about my favorite crafting tool I would probably say stencils.  They are easy to store.  They are very versatile.  And for some reason I find them less intimidating than stamps.  I do admit that even though I have tried many different techniques using stencils, I am still just a novice when it comes to this tool.  Simon Says Stamps helped me to flex that muscle a little more this week with their Monday Challenge: Use more than one stencil.   Here is what I came up with: 
I started by covering a piece of Ranger watercolor paper with Mustard Seed Distress Stain. Over that, I sponged Spiced Marmalade and Rusty Hinge Distress ink through stencil number one, Spiral Petals from Hero Arts.  Next, I spread translucent embossing paste through stencil number two, Large Flower from Hero Arts.  Once that was dry, I sponged on Seedless Preserves Distress ink, which was resisted by the embossing paste and filled in the outline of the flower.

I cut that panel into three pieces, and popped them up with some fun foam.  I heat embossed the sentiment from Club Scrap (Cherry Blossoms kit) with some White powder from Gina K Designs. The card was finished off with three Doodlebug Matte Sprinkles altered with YR07 Copic Marker and a little bow made from some fibers in my stash.

To see more of my creations, you can follow me on Instagram at #inkyscraps. 

Thanks for stopping by!

Wednesday, September 5, 2018

Autumn Colors

The challenge this month over on Stamp TV is to use autumn colors on a project.  Where I live, the colors of autumn are pretty much the same as the rest of the year.  Since green is my favorite color, that works for me!  However, I do also love the other rich dark colors of the fall season.  Here is a card I made using a red, yellow and white pallete:
I used a circle mask on the background before stamping it with Gina K. Designs’ Diagonal Stripes stamp and Wild Honey Distress Ink.  The sentiment stamp is from Gina K.’s mini stamp set called With Love And Prayers.

The name of the die I used to cut the flower is “Lotus Blossom” (no longer available from Die-Versions), but I thought it kind of looked like the mums we used to have bloom in our yard in Virginia during the fall.  I cut it out of an art orphan and used the negative space to make this card:
The background art orphan was done with Club Scrap Bookbinding Glue, Gesso and a few colors of Distress re-inkers.  I used some Glad Press N’ Seal to help transfer the little inside pieces of the flower and attached them using Gina K.’s new Connect Glue.  The sentiment for this card is from Gina K’s Autumn Wishes set.

Other supplies I used are:

**Paper from Gina K. Designs and Club Scrap.

**Each sentiment is stamped with VersaMark ink and embossed with Terra Cotta Rust powder from Lindy’s Stamp Gang.

**Each sentiment is cut out using a die from Gina K.’s Decorative Label Die Set.

**I colored in the flower on the first card with my clear Wink Of Stella pen to add a little shimmer.

**The ribbon is from Club Scrap (red from the Boardwalk kit, yellow from the Sorrento kit

**The gem is from my stash.

To see more of my creations, you can follow me on Instagram at #inkyscraps.

Thanks for stopping by!

Thursday, August 30, 2018

Take Time to Sparkle & Shine


Did you ever notice how hard it is to photograph “sparkle” and “shine” on a card?  Of course it is always a possibility it is just me.  Nevertheless, I had fun making this card for the Hero Arts Sparkle and Shine challenge:
The background started out with alcohol inks (it is from my art orphan stash so I don’t have the exact colors).  I stamped it with the Hero Arts TropicalBackground stamp using VersaMark ink, then embossed it using Hero Arts Sparkle powder.  The texture shows up in the photograph, but I wish you could see the sparkle!

The hibiscus and leaves are from the Color Layering Hibiscus stamp set from Hero Arts.  They are stamped using Mustard Seed and Spiced Marmalade Distress ink along with Gina K. Designs Wild Dandelion and Jelly Bean Green ink.   I used the solid image to stamp VersaMark ink onto the flower, then embossed it using the Sparkle powder.  Both the flower and the leaves were cut out using my Scan N’ Cut 2. 

I followed THIS tutorial from SplitcoastStampers to do the basket weave card design.

Other supplies I used are:

**Paper from Gina K. Designs and Club Scrap.

**The sentiment stamp is also from Hero Arts (no longer available).   It is stamped with VersaMark ink and embossed with Lindy’s Stamp Gang Midnight Copper powder.

**A piece of scrap velum cut with a Label Stacklets 3 die from Taylored Expressions (no longer available), altered with Abandoned Coral and Spiced Marmalade Distress ink.

**The ribbon is from Club Scrap’s Watercolor Blossoms kit, altered with Y35 Copic Marker.

**The gems are from Recollections

To see more of my creations, you can follow me on Instagram at #inkyscraps.

Thanks for stopping by!

Wednesday, July 25, 2018

Message in a Bottle

My daughter is getting married this fall and has asked for my help with a lot of DIY projects for the event - for which I am extremely grateful since I live over 4,800 miles away from her and can’t help out in too many other ways.  One of the projects is the “guest book”.  With a “pirate inspired” theme, she has decided to ask her guests to leave a message in a bottle in lieu of signing their names in a book.  (An idea that I love and wish I had done at my own wedding!) 

Imagine my surprise and delight when I saw this month’s Club Scrap kit “Sea Breeze”! The stamps and papers were PERFECT for making a holder and some note papers for the guests to write their messages on:

My husband used some scrap wood pieces to make the holder for the note papers and pens.  I painted the insides (using a mix of various acrylic paints I had on hand to try to match the papers), then used one of the print papers to cover the outside.  I covered the top part using the washi tape included in the kit.  Some ribbon and a few of the starfish and the holder was finished.
The paper for the notes is some letterhead paper from Gartner (I found it at Office Max).  I used stamps from Sea Breeze to stamp the bottle, the shells and “A message for you” with Ash and Lagoon inks from Club Scrap. (Ok, full disclosure…I still have to stamp most of the sheets!)

To see more of my creations, you can follow me on Instagram at #inkyscraps.

Thanks for stopping by!

Friday, July 20, 2018

Let’s Go to the Beach!

Club Scrap challenged us to make a “beachy background” with their technique challenge for this month.  Here is my take on that: 
This card came together pretty quickly.   I used Mahogany Club Scrap ink to randomly stamp some shells and a sentiment from the Club Scrap Sea Breeze stamp set onto the “sand” (a piece of Kraft colored cardstock from Club Scrap - but please don’t ask me which kit!).   For the sentiment and part of a couple of shells, I also embossed them with VersaMark ink and Sparkle embossing powder from Hero Arts to give them a wet look (that didn’t show up very well in the photo).

The “water” is made by adding various colors of Ranger Alcohol Ink onto a surface called Vertigo from Imagine Crafts.  I fussy cut a “water line” and attached it using some Stick It.

To finish off the card, I added some raffia ribbon (from Club Scrap’s Connections kit), a die cut starfish from Cherry Lynn Designs covered with the same Sparkle Embossing Powder and a sand dollar charm altered with E33 Copic Marker (appropriately called sand).

To see more of my creations, you can follow me on Instagram at #inkyscraps.

Thanks for stopping by!

Tuesday, July 3, 2018

Summertime Fun Birthday

Here’s hoping everyone is having a fun summer!  I can’t believe that we are into July already.  I did have fun making this Summer-y card for the “Summertime Fun” challenge over on the Hero Arts blog:
I recently did a background using my gel printing plate, Reeves Acrylic paints and a brayer.  (You can see the results HERE). The background for this card was created with the “leftover” paint on my brayer.  The hibiscus flowers are layered stamps from Hero Arts that are stamped with Distress inks (see colors below) and cut out using my Scan N Cut (although Hero Arts does offer matching dies with this set).

Other supplies I used are:

**Paper from Gina K. Designs and Club Scrap.

**Distress ink colors are Abandoned Coral, Festive Berries, Candied Apple, Seedless Preserves, Squeezed Lemonade, Mustard Seed, Fossilized Amber, Shabby Shutters and Peeled Paint.

**The sentiment is from Hero Arts, stamped with VersaMark ink, and embossed with Red Hot Gina K. Designs powder.

**The frame around the sentiment is a die from Gina K. Designs (no longer available).

To see more of my creations, you can follow me on Instagram at #inkyscraps.

Thanks for stopping by!

Friday, June 29, 2018

Nautical Marbling

This month’s technique challenge over on the Club Scrap blog is to do some marbling.  Since I didn’t have the appropriate supplies to do any of the suggested techniques, I set about to see what I could do with what I have on hand.  Here is the card that I made:
I pulled out my gel printing plate, my brayer and three colors of Reeves Acrylic paints.  After laying down a few lines of the paints, I used my brayer to smooth them out and blend them a little.  Then using the best tool – my finger – I randomly smeared the paints a little more and pulled a print.

I used a spellbinders die to cut out an opening, then stamped an anchor from Club Scrap’s Bon Voyage kit onto the white cardstock underneath with VersaMark ink.  After embossing the image using Hermite powder from Club Scrap, I colored it in with a mix of Pewter Liquid Pearls and water.  I finished off the card with some paper cording that came with my Lavender Fields Club Scrap kit.

For me, this is a very CAS card…but it was a lot of fun to make!

To see more of my creations, you can follow me on Instagram at #inkyscraps.

Thanks for stopping by!

Wednesday, June 27, 2018

Friday Night Fireworks


I am one of the lucky people who have the chance to live on the island of Oahu in Hawaii.  While living on an island does have its challenges, it also has many rewards too.  For example, one of the big hotels down in Waikiki puts on a fireworks display EVERY Friday evening.  We recently went down there for dinner and the fireworks show, which coincided nicely with the arrival of my June "Firecracker" kit from Club Scrap:
Everything used for this layout came from my "Firecracker" kit except:

**The glitter tape came with my Club Scrap “Surprise” kit.

**I used my Clear Wink of Stella pen through the Firecracker Stencil to add a little texture to the gray paper.

**To tone down the white on the journal card and the large tag I used C3 Copic Marker to color them.

**The button is the back side of a button that came from my Club Scrap "Lavender Fields" kit, altered with Festive Berries Distress Stain.

**The title was cut out using my Scan N Cut and the AR Berkley font.  I cut it out three times, glued them together, inked each piece with VersaMark ink.  I embossed the Fireworks piece with Diamond Sparkle  powder from JudiKins, then embossed all of the pieces with Clear WOW powder.

To see more of my creations, you can follow me on Instagram at #inkyscraps.

Thanks for stopping by!

Sunday, June 24, 2018

Wild Shades of Gray

I admit it – I like gray as an accent color, but it is not my go to for a main color.  That said, I couldn’t resist the Monthly Mix Challenge from Gina K. Designs.  After all, these challenges are supposed to help push us out of our comfort zone, right?  I made a birthday card for my brother-in-law:
The background is made with Slate, Terra Cotta and Gunmetal Alcohol inks.  The elephant and the sentiment stamps are both from an old Gina K. Designs set called “Wild About You” (sadly, it is no longer available).  I stamped and embossed the elephant, then colored it in with some Sassy Silver Glimmer Glaze from Tattered Angels. 

Other supplies I used are:

**Paper from Gina K. Designs and Club Scrap.

**The sentiment was stamped using Pumpkin StazOn ink.

**The elephant was stamped with Onyx Black VersaFine ink and embossed with Clear Gina K. Designs powder.

**The elephant’s tusks are colored in with Picket Fence Distress Marker.

**The “Bling Stickers” are from Recollections.  They are altered with the Gunmetal Alcohol Ink.

**The ribbon is upcycled.

To see more of my creations, you can follow me on Instagram at #inkyscraps.

Thanks for stopping by!

Friday, June 22, 2018

Just Shine

Bright and Cheerful is what the Simon Says Wednesday challenge is looking for.  With everything going on around the world, I think that is a good thing to ask for!  Here is my submission to their challenge:
The background was supposed to be this really cool looking technique that I tried.  Alas, mine didn’t turn out the way the demo did, but I liked it enough to use on this card.  It was done using Club Scrap Bookbinding Glue, Distress Re-Inkers and Gesso. 

Other supplies I used are:

**Paper from Gina K. Designs and Club Scrap.

**The sun die is from Die-Versions (no longer available) and is covered with Sunset Yellow Orange embossing powder from Lindy’s Stamp Gang.

**The small stamps are from Club Scrap’s “Moroccan Spice” kit, stamped with Picked Raspberry Distress ink.

**The sentiment stamp is from Club Scrap’s “Peacock” kit. It is on a tag cut out with a Spellbinders Petite Labels One die, stamped with Picked Raspberry Distress ink, covered with Geranium Coral Blush embossing powder from Lindy’s Stamp Gang.

**The ribbon came with Club Scrap’s “Sweet Tooth” kit.

**As finishing touches I edged the small squares with Squeezed Lemonade Distress Ink, I went over the edges of the small squares and the sentiment tag with my Black Copic Marker and I added a couple of drops of Honey Gold Nuvo Drops.

To see more of my creations, you can follow me on Instagram at #inkyscraps.

Thanks for stopping by!


Monday, June 4, 2018

Water Colored Encouragement

It wasn’t too long ago that I discovered the Hero Arts Blog and their monthly challenges.  I decided to jump in for the current challenge – Watercolor.  This is not one of my go to mediums, but when I saw Jennifer McGuire’s video “Block Watercolor Stamping”, I wanted to give it a try.   Here is the card I made to donate to Card Care Connection:
I used Fossilized Amber, Abandoned Coral, Dusty Concord and Peeled Paint Distress Ink on my stamp block for the background. Once the background had dried, I added the mountains stamped with the Dusty Concord ink and some of the grasses stamped with the Peeled Paint ink.  I tried stamping the mountain lion onto the scene, but it was a fail. So, I stamped it on another sheet using Tea Dye and Aged Mahogany Distress inks and cut it out using my Scan N Cut.  All of the stamps, including the sentiment, are from the “Color Layering Mountain Lion” set at Hero Arts.

Other supplies I used are:

**Paper from Gina K. Designs and Club Scrap along with Ranger Watercolor Paper.

**The sentiment is on a tag cut out with a die from the Tim Holtz “Tag Collection”.  I did some partial cutting with my Big Shot to stretch the tag to fit the sentiment.

**The sentiment was stamped with VersaMark ink and embossed using Gina K. Designs Fine Detail White powder.

**The twine is waxed linen thread from Club Scrap.

To see more of my creations, you can follow me on Instagram at #inkyscraps.

Thanks for stopping by!

Friday, June 1, 2018

Turning Negative into Positive

I've been told that it is good practice to turn a negative into a positive whenever possible.  That seems to be getting harder to do, at least if you pay any attention to media (both social and main stream).   But, I have determined that it can be an easy task when making cards when you use a die.  Here is an example:
I needed to make a somewhat quick thank you card so I pulled out THIS die by Stephanie Bernard for Sizzix.  I used it to cut an art orphan that had been covered in Cosmic Brown Nuvo Embellishment Mousse (it had been an experiment gone wrong.).  Before taking everything out of the die, I covered the whole thing with a piece of Press N Seal from my kitchen.   I pulled off the main piece, then used the Press N Seal to flip over the remaining pieces so I could add glue to them.  Once they all had the glue, I just placed a piece of card stock over them and pressed to adhere.  I did spread a coat of Glue N Seal (which is now Distress Collage Medium) over the whole panel to help make sure the pieces won’t come off.

Other supplies I used are:

**Paper from Gina K. Designs and Club Scrap.

**Flowers are from my stash (a mix of Prima, Recollections and I’m not sure) and are altered with B99 and R59 Copic Markers.

**The blue ribbon is from Club Scrap, altered with the B99 Copic Marker. The red ribbon is upcycled.

I am linking this to the Simon Says Wednesday “Anything Goes” Challenge for this week. If you have time you should go check out all the fun projects!

To see more of my creations, you can follow me on Instagram at #inkyscraps.

Thanks for stopping by!

Wednesday, May 16, 2018

An Anniversary Wreath

It took the Club Scrap Technique Challenge to push me into giving this trend a try, but I now admit that it is kind of fun to take an “ordinary” stamp image and make a wreath out of it.   I turned my hibiscus wreath into an anniversary card:
The wreath is made up of two different hibiscus stamps from the Club Scrap Beaches kit.  I colored the stamps with Mustard Seed, Ripe Persimmon and Shabby Shutters Distress Markers, “huffed” on them and stamped.  My MISTI really came in handy to help with the placing of the stamps, as well as being able to color and stamp each image multiple times for a better image.

The heart in the middle is a chipboard piece that I picked up at Michaels a long time ago (I think it is the Recollections brand).  To color it I mixed some Pearl Adirondack paint (no longer available) with some Ripe Persimmon Distress re-inker and just kind of slathered it on the heart with my finger.

Other supplies I used are:

**Paper from Club Scrap.

**The sentiment stamp is from Club Scrap (Vogue), stamped with VersaMark ink and embossed using the Earthtone Paprika Powder from WOW.

**Background is stamped with Tangerine Club Scrap Hybrid Ink using a stamp from Club Scrap (Short Sleeve Pants).

** The wreath panel’s edges are inked with Ripe Persimmon Distress ink, the background panel’s edges are inked with Tangerine Club Scrap Hybrid Ink.

**The Ribbons is upcycled, altered with the Ripe Persimmon Distress Marker.

To see more of my creations, you can follow me on Instagram at #inkyscraps.

Thanks for stopping by!

Sunday, May 6, 2018

A Stencil + Embossing Powders = A Rainbow

I love stencils and I am always looking for fun new ways to use them.  After seeing Jennifer McGuire’s Layered Heat Embossing technique, I knew it would be fun to pair it with this month’s challenge on Stamp TV – Rainbow Stenciling. Here are the two cards I made:


I started by covering two pieces of card stock with Gold Zing embossing powder and heat setting.  I then placed the Water Droplets stencil from Gina K. Design onto one of the pieces and covered it with my Emboss It Dabber ink.  Once I was satisfied with the coverage, I carefully flipped the stencil over onto the other piece, covered it with a scrap of paper and brayered it to transfer the ink.

Then it was just a matter of sprinkling the different colors of embossing powder onto each piece.  I used Fiddlehead Fern Green, Venus Violet Blue, Hyacinth Blue Jade and Candy Cane Red Gold powders from Lindy’s Stamp Gang. Check out Jennifer’s video for more detailed instructions on this cool technique.

Other supplies I used are:

**Paper from Gina K Designs and Club Scrap.

**The ornament stamp is from an old Gina K. Designs “Merry & Bright” set (which is different than the current set with the same name), stamped with Distress Embossing ink and embossed using the Gold Zing Powder.

**The ovals were cut using dies from the “Nesting Ovals” die set from We R Memory Keepers.

**Both ribbons came from Club Scrap – the green from the Garden Shed kit and the burgundy from the Hot Chicks kit.

**The flowers are from Prima, altered with Cranberry and Bottle Alcohol ink.

**The “gem” is from my stash.

To see more of my creations, you can follow me on Instagram at #inkyscraps.

Thanks for stopping by!

Monday, April 30, 2018

2 Cards from One Experiment

I recently discovered the Hero Arts Blog and their challenges, and decided that I wanted to play along.  The current challenge is to “put a flower on it”…perfect for making a Mother’s Day card for my Mom:
I wanted to do an old technique using sticky back canvas and Distress markers.  I had done it with stamps, but I was wondering if it would work with a stencil.   I pulled out my Hero Arts Large Flower stencil, placed it over a piece of card stock and ran my Emboss It Dabber over the stencil.  Once it was coated, I flipped the stencil over onto a piece of sticky back canvas and burnished it good.  I then used some Zing White embossing powder and heat set.  (I’ll get back to the piece of card stock I had under the stencil soon.) 

I colored in the embossed image with Squeezed Lemonade, Dried Marigold and Spun Sugar Distress Markers, then sprayed it generously with Iridescent Memories Mist and let it dry.  I finished off the card by cutting out three copies of the sentient with my Scan N Cut, stacking them together then covering them with about four layers of Lindy’s Stamp Gang’s Sunset Yellow Orange embossing powder.  I added some raffia ribbon (from my Club Scrap Kit “Serenity”) and some gems from my stash.

So, remember that piece of card stock that was under the stencil when I used the Emboss It Dabber? Here is what became of it:
I covered it with Scotch Broom Yellow and Hyacinth Blue Jade embossing powder from Lindy’s Stamp Gang.  Since it was on white card stock, I sponged on some Tumbled Glass Distress ink to fill in the gaps with some color.   I stamped the sentiment (from DRS Designs) with Blue Denim ink from Gina K. Designs and finished off the card with some upcycled ribbon altered with Y18 Copic marker.

All the paper for both cards came from Gina K. Designs and Club Scrap.

To see more of my creations, you can follow me on Instagram at #inkyscraps.

Thanks for stopping by!

Thursday, April 26, 2018

Tropical Flower Power

Flowers seem to be the theme on everyone’s minds these days – it must be spring!  I jumped into the Simon Says Stamps Monday challenge with some hibiscus die cuts and made two cards:

Half of the background is Ranger alcohol inks on vellum (it is an art orphan so I don’t have the exact colors).  For the other half of the background I used an Emboss It Dabber through Tim Holtz’s “Rays” layering stencil, embossed it using Sticky powder, then covered it with Gilding Flakes.  I die cut the flowers using the two sizes of hibiscus dies from Tim Holtz’s “Tropical” set.  I used Abandoned Coral and Wild Honey Distress markers to add some interest.

Other supplies I used are:

**Paper from Gina K Designs and Club Scrap.

**The sentiment stamp “Today, fill your cup…” is an old one from Club Scrap’s Tilescapes kit. 
The “Hello Sunshine” stamp is from Gina K. Designs.   Both are stamped with VersaMark ink and embossed with Pumpkin Fiesta powder from Lindy’s Stamp Gang.

**The “Hello Sunshine” sentiment tag was cut out with a Die-Versions die (no longer available).

**The blue ribbon is from Ellen Hutson, the gold ribbon is from Club Scrap’s Scandinavia kit.

**The nailhead is from Mark Richards, the gems are Recollections altered with R24 Copic Marker.

Full disclosure: I got the inspiration for the layouts of these cards from THIS beautiful card I found on Splitcoaststampers.

To see more of my creations, you can follow me on Instagram at #inkyscraps.

Thanks for stopping by!

Thursday, April 19, 2018

Another Day in Paradise

Mother Nature is still acting bi-polar in most of the country, so maybe Simon Says Stamp’s Wednesday Challenge “Sparkle and Shine” can help lift all of our spirits.  I went with more shine than the sparkle on my card:
The background was done with Pthalo Green, Turquoise and Ultramarine Blue Color Bursts.   The honu is from the Crafters Workshop’s “Mini Sea Turtles” stencil.  I first inked the body parts with Mowed Lawn Distress ink mixed with a little bit of Pearl Mica Spray.  For the shell I used Cosmic Brown Nuvo Embellishment Mousse.  I fussy cut it, and used dimensional tape just under the shell.  

Other supplies I used are:

**Paper from Gina K Designs and Club Scrap.

**The sentiment stamp is from Rubbernecker Stamps, stamped with VersaMark ink and embossed with Midnight Teal powder from Lindy’s Stamp Gang.

**The sentiment tag was cut out with a Spellbinder die (no longer available).  I used the Mousse along the edges to add some interest.

**The ribbon is from the “Random Doorways” kit from Club Scrap, altered with Color Burst Liquid Metal Copper to add some shimmer.

**The nailheads are Mark Richards, altered with YG17 Copic Marker.

This was my first time using the Nuvo Mousse…but it won’t be my last!

To see more of my creations, you can follow me on Instagram at #inkyscraps.

Thanks for stopping by!

Thursday, April 5, 2018

Tropical Birthday

To help celebrate Simon Says Stamps birthday, this week’s SSS Wednesday Challenge is to make a birthday card.  I know a lot of the country is not getting the spring weather they have been waiting for, so I went a little tropical with my card to help warm things up:
The background started out with Turquoise, Pthalo Green and Ultramarine Blue Color Burst.  I added some texture using an old Simon Says Stamps stencil (no longer available), Dreamweaver Translucent embossing paste and Lindy’s Stamp Gang Midnight Teal embossing powder.

The hibiscus is a stamp from Stampendous (which doesn’t seem to be available anymore).  I colored the stamp using Fossilized Amber, Spiced Marmalade, Ripe Persimmon and Pine Needles Distress Markers.  After “huffing” on it to add moisture, I stamped it down onto yellow cardstock.  Oh, I should mention that I used my MISTI which made it easy to repeat the process a few times until I got the desired effect.  I then stamped it one last time using VersaMark ink and embossed it with WOW Clear Gloss powder.  I colored in the flower using the same Distress Marker colors mixed with some Pearl Mica Spray and fussy cut it.

The “happy birthday” die is from Simon Says Stamps.   I cut it out twice then stacked the pieces together.  It is embossed with a few layers of Midnight Teal powder from Lindy’s Stamp Gang, then glued onto a scrap of velum colored with Y15 Copic Marker.

Other supplies I used are:

**Paper from Gina K Designs and Club Scrap.

**The ribbon is form the “Sweet Tooth” kit from Club Scrap.

**The “gems” are from my stash, altered with BG99 Copic Marker.

Happy 9th Birthday to Simon Says Stamps!  Thank you for enabling supplying us with all of our crafty needs!

To see more of my creations, you can follow me on Instagram at #inkyscraps. https://www.instagram.com/inkyscraps/

Thanks for stopping by!


Tuesday, April 3, 2018

A Trio of...Starfish

Yesterday I was playing around with a new (to me) technique that Jennifer McGuire calls Faux Metallic Stamping.  My first attempt didn’t turn out quite the way I had hoped.  But, I couldn’t just throw it away so I got creative with the other elements of the card to hide the “crummy” parts.  Since this week’s Simon Says Stamps’ Monday Challenge is asking for a trio of something I also added three starfish dies and ended up with this:
I stamped the background with three different images (from Gina K. Designs “Gifts from the Sea” set) using Distress Embossing Ink, then embossed it using Clear powder from Gina K. Designs.  I then colored in each design using a VersaMarker and dusted them with Biscotti Perfect Pearls.  Please check out Jennifer’s video for full details on how to do this technique (she explains it so much better!)

Other supplies I used are:

**Paper from Gina K Designs and Club Scrap.

**The sentiment stamp is also from the Gina K. Designs “Gifts from the Sea” set.  It was stamped with Chipped Sapphire Distress Ink then embossed with Clear powder from Gina K. Designs.  The tag is from Spellbinders

**The starfish die is from Cherry Lynn Designs.  I cut them out of the blue paper, colored them with Tarnished Brass Distress Crayon then sprinkled Gina K. Designs’ Gold embossing powder over the crayon, brushing some off before adding heat. 

**Both of the ribbons came with Club Scrap Kits – the blue is from What a Ride, the natural is from Vintage Botany.

**The nail head “stickers” are from Marc Richards.

This card will be included in the next box I send to Card Care Connection.

I did try the technique again with better results:
 
To see more of my creations, you can follow me on Instagram at #inkyscraps. https://www.instagram.com/inkyscraps/

Thanks for stopping by!