Saturday, January 28, 2017

Tea Stained Wings

I had fun combining three different challenges to make two birthday cards.  I followed this weeks  Mojo Monday Sketch Challenge, I used “something with wings” for the Simon Says Stamp Monday Challenge. and I played around with a new (to me) technique for Club Scrap’s January Technique Challenge, tea staining.

I have often stained things with tea, but not on purpose, so I thought this would be an easy technique. Well…it probably is, but I made it a bit more challenging.  Again, not on purpose.  My first attempts to stain some paper and ribbon didn’t work out too well.   I used a mint tea that I have, but after soaking my stuff for nearly an hour, it didn’t look much different (unless compared to the original color, but even then it wasn’t that much darker).  I didn’t want to waste the supplies, so I made this card:
Here is a list of supplies I used on this card:

**yellow paper is Bazzill, the rest is Club Scrap.

**I used the negative of a Daisy Branch die from Die-Namites and added papers behind it to fill it in. The square was cut using Spellbinders Labels Three.

**the ribbon is from Club Scrap's “Vogue” kit.

**the sentiment stamp is from Club Scrap's “Pure & Simple” kit, stamped with VersaMark ink, embossed with Midnight Emerald EP from Lindy’s Stamp Gang.

**Tea Dye Distress Ink was used on the edges (I figured it was appropriate for this challenge).  The flower centers are Antique Bronze Stickles.

**The butter fly is from Prima Flowers; the gem at the center was altered with Copic Marker #BG99.

Since I wanted to submit a project for the CS challenge, I figured I better try for something that looked like it had been stained. So, I got out my red cooking wine and soaked some cardstock and some vellum. That worked a little better. Here is the card I made from those:
While the cardstock was still somewhat damp, I did a letterpress technique on it using Victorian Velvet Distress Ink and a Tim Holtz Harlequin stencil. That became the background for this card.

Here is a list of the other supplies I used:

**all paper is from Club Scrap except the base of the bird is Ranger Watercolor Paper and the vellum which is from my stash.

** A stencil from Club Scrap's “Vogue”  kit was used on the oval part. It was traced with Seedless Preserves Distress Marker, and colored in using that color mixed with Perfect Pearl Mist. The oval was then edged with Mowed Lawn Distress Ink and covered with the wine stained vellum.

**The “Lace Hummingbird” die is from Cherry Lynn Designs.  It was adhered to the watercolor paper that had been covered with Orchid and Merlot Color Bursts mixed with the Perfect Pearl Mist, then fussy cut.

**The ribbon was upcycled and altered with Copic Marker #RV23

** The HB tag is from The Paper Studio (which I found at Hobby Lobby), altered with the Seedless Preserves Distress Marker.

Sorry for the long post! I tend to mix a lot of different supplies when I create my projects.

Thanks for stopping by!

Wednesday, January 25, 2017

A Challenge and A Blog Party

The end of January means it is time to celebrate Club Scrap’s “Color Me Happy” kit with a Blog Hop and Linky Party! Be sure to check out all of the fun over on the Club Scrap Blog.  My entry to the party is a layout that I am also linking to the 1/17 Monthly Layout Challenge:
I followed the layout idea recipe card (available to kit members only) from “Color Me Happy”. I love those recipe cards as starting points for my inspiration, but I have to confess that this is the first time I followed one so closely. Everything I used is from my “Color Me Happy” Lite kit except for these:

**yellow paper is a piece of Bazzill that I had in my stash.

**I used three cut-a-parts from CS “Seaside” kit, the turtle, the square under the sun stamp and the blue strip under the title. The side strip with the “beauty…” quote is also a cut-a-part from a CS kit, but I don’t remember which one. It is altered with Wild Honey Distress Stain.

**the sun stamp is from Rubber Stamp Plantation. I fussy cut it after stamping and embossing it.

**The title letters are from Pebbles…I’m pretty sure they came as an extra goodie with one of my CS kits, but again I’m not sure which one. They too are altered with the Wild Honey Distress Stain.

**I used Club Scrap Hybrid Ink in Tangerine (stamped sun, and edges of cut-a-part), Lagoon (edges of turtle cut-a-part) and Neon Green (edges of strips under title). I also used Distress embossing ink over the sun stamp.

** Sunset Yellow Orange Lindy’s Stamp Gang Embossing Powder was used over the stamped sun.

**the wooden accents are some Koa wood embellishments that I picked up at a local craft fair, but there is no name on the packaging (and I didn’t think to record it elsewhere at the time I bought them). The little mirror pieces are (I think) left over from the old CS kit “Mirror, Mirror”. I love using up some of my old supplies to make room for the new stuff!

By submitting this layout for the layout challenge, I complete "Julie's Ultimate Challenge" as well.   Whew!!  I wasn't sure if I had it in me, but I did it!  Thanks for the extra creative push this month Julie!

Thanks for stopping by!

Thursday, January 19, 2017

Jump Start on Christmas Projects

Ok, maybe not quite a jump start considering that I actually started putting this Perpetual Desk Calendar project together last December intending to give it at Christmas. Life got in the way and time wouldn’t slow down no matter how much I begged it, so I put this aside and gave something else. This was a project that was included in Club Scrap’s November 2011 Tilescapes kit, so it had already sat around a long time waiting for some love…what was a few more weeks.

Along comes the 1/17 Project Use-It challenge on the Club Scrap Forum. I pulled out the desk calendar and actually got it done. The most time consuming part for me was decorating the calendar pages. Here is the finished product:

The structure of the calendar was all from the Tilescapes kit. Other than that, I was all over the place with supplies on this one so I will just give a list of what I used. If you would like more details on anything, let me know in the comment section.

**Stamps: Club Scrap (Beaches, Navagation, Woven Strands, Tribal, Castaway, Seaside, Bandanarama, Transformations, Celebrate), Tim Holtz

**Stencils: Club Scrap (Versailles, Dahlia, Castaway, Nature’s Retreat, Moroccan Spice Cape Cod), Memory Box. Hero Arts (Waves, Swirl), The Crafters Workshop, Stampinback, Rubber Stamp Plantation.

**Dies: Spellbinder (Vines of Passion, Whimsical Tree), Gina K. Designs, Die-namics

**Cut-a-parts: Club Scrap (Girlfriends, Woven Strands)

**Ink: Club Scrap (Topaz, Ocean, Tangerine), Distress (Brushed Corduroy, Salty Ocean, Rusty Hinge, Crushed Olive, Embossing Ink), Glimmer Mist (Sea Glass, Dragonfly, Olive Vine).

**Embossing Powder: Lindy’s Stamp Gang (Hyacinth Blue Jade, Bysantine Bronze, Midnight Gold, Midnight Teal, Cleopatra’s Copper).

**I also used a little Distress Collage Medium (Vintage) on the stenciled starfish.

Whew. I think I got everything. Now I can clear it all of my desk and have room to start the next project.

Thanks for stopping by!

Wednesday, January 18, 2017

The Nine of Spades = 6 Cards

Challenges can be fun. Like turning the nine of spades into 6 greeting cards. No, not exactly magic, just a clever formula for cutting paper. Club Scrap has Idea Decks for both cards and layouts which give you 52 different ideas per deck, all with precise cutting instructions to quickly and efficiently turn your paper into works of art. I found an “Idea Deck Challenge” over on the Club Scrap forum which says to use the nine of spades from any of the decks. Here is what I came up with using idea deck #1:
The Club Scrap base papers are from my "Paradise" Lite Kit, and the other paper (8.5 x 11) is from "Henna". Rather than bore you with the play by play, I’ll just list the other supplies I used.

**Stamps: Club Scrap (Beaches, Weathered Florals, Graduation), The Stamps of Life, I Break For Stamps, Unity, Gina K. Designs,

**Ink: Club Scrap (Leaf, Neon Green, Lagoon, Neon Blue, Fuchsia, Neon Pink, Neon Orange), Gina K. Designs (Innocent Pink), Distress Embossing Ink, Smooch Ink (Carrot, Sassy Pink, Taffy, Kiwi, Azure, Platinum), Distress Markers (Worn Lipstick, Peeled Paint, Twisted Citron, Carved Pumpkin), and Zig Writer (Gold).

**Embossing Powder: Zing (Apricot), and Lindy’s Stamp Gang (Pumpkin Fiesta, Hyacinth Blue Jade, Geranium Coral Blush).

**Stencils: Club Scrap (Versailles), Memory Box. Hero Arts (Waves, Swirl Stencil).

**Dies: Spellbinder (Fairmont Labels)

**Ribbon: Club Scrap (Dahlia, Come Sail Away), Ellen Hutson, Taylored Expressions, and two that I’m not sure where they came from.

**Bling: from my stash.

As of writing this, all except the Card Idea Deck #2 is out of stock at Club Scrap, but check back later...these are a fun way to get your mojo going!

If you have questions, or want more detailed info, just ask in a comment below.

Thanks for stopping by!

Tuesday, January 17, 2017

One Card – Three Challenges

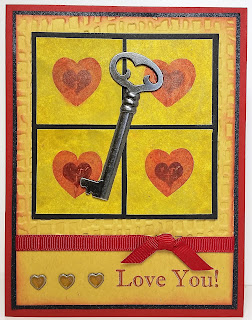
I recently discovered the “challenge” section of the Club Scrap Forum and decided to give some of them a try. Jumping right in, I covered three of the challenges for this Valentine’s card:
First is the 1/17 Card Sketch Challenge using this sketch (which I rotated):
Second is the 1/17 Tool & Stash Challenge which is to use buttons, brads or beads. I used some heart brads that from my stash that I “filled in” with some saffron Glimmer Glaze.

Third is the 1/17 NBUS Challenge (Never Before Used), which is to use a Club Scrap kit item that you have never used before (or at least not in a long time). I chose the little heart stamp which came as a Retreat extra a few years back (but I don’t remember which year). I also used the stencil from Crewel & Unusual kit to create the base of the hearts. Confession time – I have used that stencil before, but not that particular part of it.

Here are the other supplies I used:

**paper is from Club Scrap, various kits.

**Ruby Club Scrap ink for the base heart and edging, Chalk-a-Lots by Memories for the stamped heart (I don’t know the color name, and I don't think is available anywhere anymore).

**sentiment stamp is from Gina K. Designs.

**background paper embossed with folder from Sizzix (Burlap).

**ribbon is from Club Scrap “Tahiti”

**key is from my stash.

I should note that the hearts are stenciled and stamped onto a scrap of an art orphan that I have no idea what I used to create.

Thanks for stopping by!

Wednesday, January 4, 2017

Back to Crafting

Happy New Year! It is good to be back playing in my space again after some unintentional time off finishing other Christmas projects and then celebrating the holiday with my visiting family. I have come up with two new crafting resolutions for 2017: to use up some of my old supplies, and to participate in more challenges. To get started on those, I made a couple of cards for this week’s Mojo Monday sketch:
This is my first card:
The background is an art orphan, but don’t remember what or how I made it. (Ok, another resolution: write info on the back when I play around with new techniques and make “art orphans”).

One of my favorite crafting quotes is: “There are no mistakes, only creative possibilities”. Unfortunately I don’t remember who or where I got the quote from, but I was inspired by it on this card. After I glued down all of the background pieces to the card base I realized that I had forgot to add the blue ribbon which corresponds with an element of the sketch, plus helps pull my whole design together. After some thinking, I cut a slit in the top of the card, threaded the ribbon through and secured it on the inside using another die cut flower, adding some interested in the process. Never give up without a fight! Here is what the inside of the card looks like: 
  Here are the supplies I used for this card:

**paper is from Gina K. Designs (base) and Club Scrap.

**flower stamp is from Heartfelt Creations and the sentiment stamps are from Club Scrap “Transformations”.

**border die is from Spellbinders, flower die is from Heartfelt Creations.

**ribbon is from Club Scrap “Girlfriends”.

**flower is stamped with Victorian Velvet Distress Ink, sentiment is stamped with Distress Embossing Ink, and embossed with Hydrangea Blue Mauve powder from Lindy’s Stamp Gang.

**bling and brad are from my stash

This is my second card:
Ok, I do know that Christmas is over, but I am going to try to stay ahead on my Christmas cards this year (it helps that my decorations are still up…we’ll see how long it lasts!). I used another art orphan from my stash (don’t know details on this one either) for the background.

Here are the other supplies I used:

**paper is from Gina K. Designs (base) and Club Scrap.

**ornament is a Dazzles sticker (that apparently is so old they are not available anymore) on an art orphan made with  Color Bursts.

**blue ribbon is from Club Scrap “Girlfriends”, the ribbon on the edge is upcycled, altered with Evergreen Bough Distress Stain

**bow is DMC thread (#995), bling is from my stash.

Wishing everyone a perfectly crafty 2017!

Thanks for stopping by!