Saturday, December 16, 2017

Let It Snow


Club Scrap’s Technique Challenge for December is “repeat stamping”.  I have a Club Scrap sentiment stamp from a long time ago that lent itself perfectly to this idea.   I decided to make a Christmas card for my husband (be glad you can’t hear me singing!):
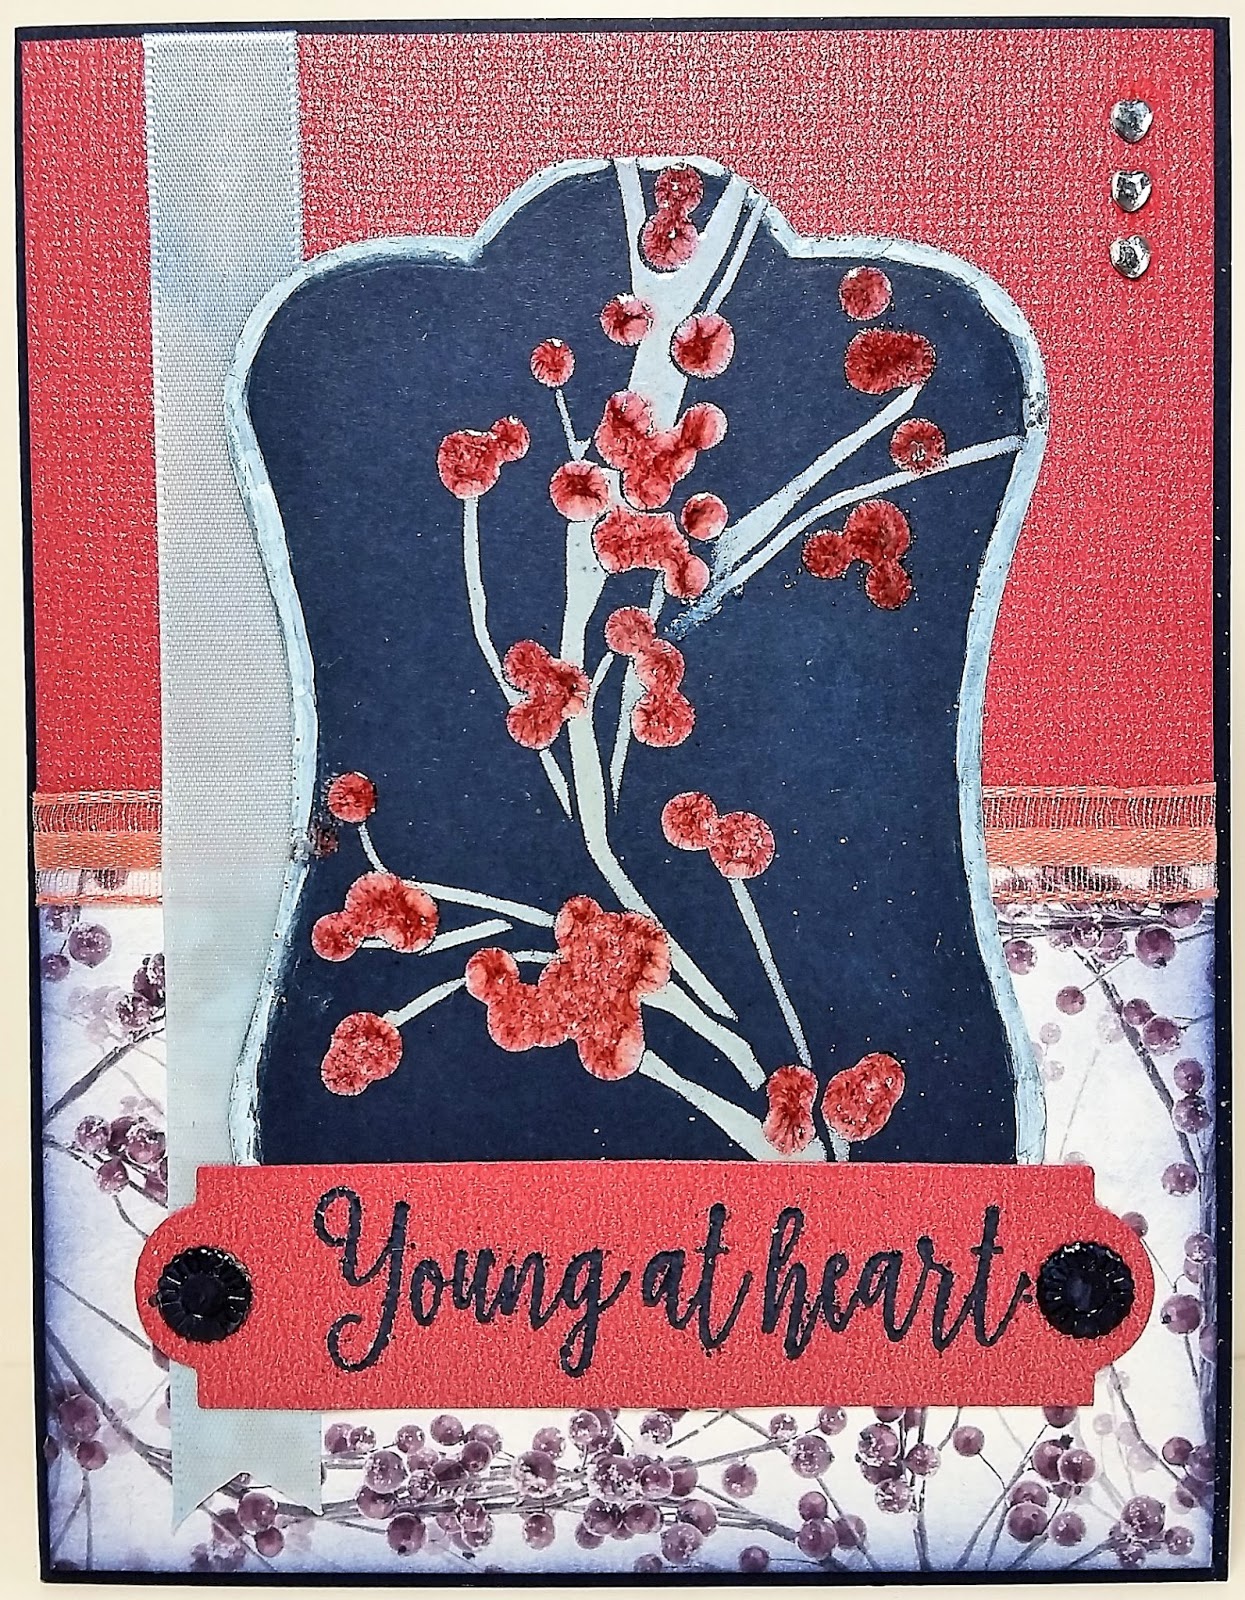
The background was done with Iced Spruce and Stormy Sky Distress inks covered with Perfect Pearls.  The snowflake stamp is from Club Scrap’s “Shades of Winter” kit, stamped with Gina K. Designs In the Navy ink, embossed with Lindy’s Stamp Gang’s Queen Sheba’s Silver embossing powder.  The sentiment is stamped with VersaMark and embossed with Hematite embossing powder from Club Scrap (again, a long time ago).

Over the years I have spent with my husband I have heard many times how he was hoping for a “white Christmas”.  Since he spent most of his growing up years in Hawaii and Northern California, it makes sense.  We did experience a few, but most were just “brown”.  This year I actually heard him say he is glad we won’t be getting snow…maybe it is because we are now living in Hawaii.  With all that in mind, here is what I did to the inside of the card:
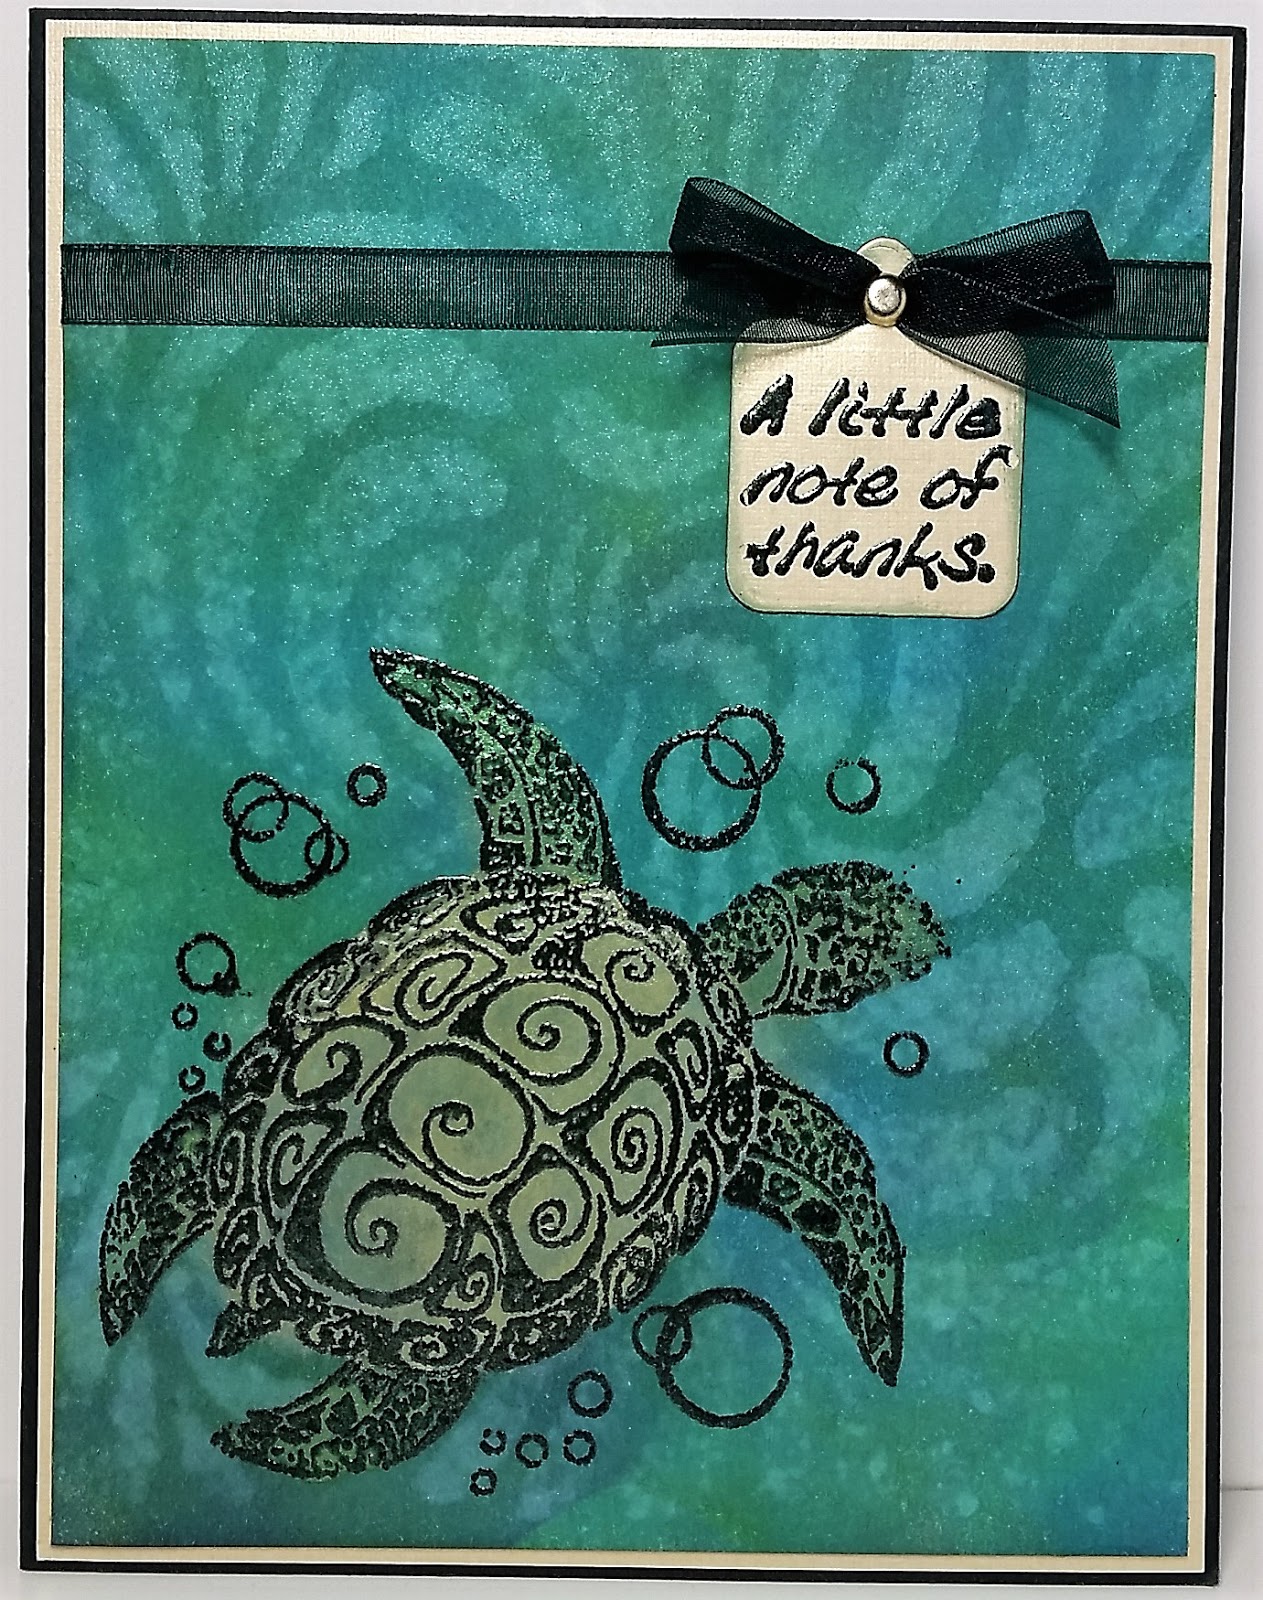
The “beach” is a stamp from Seaside Stampin’ Ink, stamped with Stormy Sky and Vintage Photo Distress Markers.  The palm trees are a stamp from Taylored Expressions, stamped with Ground Expresso and Peeled Paint Distress Markers.  The sentiments are printed from my computer.

Other supplies I used are:

**Card stock from Gina K Designs and Club Scrap.

**the ribbon is from Club Scrap (Time of Your Life), altered with Copic Marker.B99

**the gem is from Recollections.

Whether you are in snow or sand, I want to wish you a very Merry Christmas!

Thanks for stopping by!

Friday, November 17, 2017

Feeling Tear-able

Life has been a little crazy lately…mostly with trying to find time to plan and finish Christmas projects before a Thanksgiving trip followed by visitors from the mainland for a week, followed by family visiting from the mainland for Christmas week.  With all of that, I am trying to find little moments here and there where I can just play.  I was able to do just that today.

This month’s Club Scrap Technique Challenge is to use torn paper.  I love how simple it is to add a little extra texture and dimension with no extra tools!   Since I have been hearing of snow falling in different parts of the country already, I thought I would go with a slightly more "tropical" theme for my card:
The plumeria flower in the center is a stencil from Rubber Stamp Plantation.   I spread pearlescent embossing paste from Dreamweaver over the stencil, then sprinkled it with Pumpkin Fiesta embossing powder from Lindy’s Stamp Gang.   After the paste dried, I heat set the powder and fussy cut out the image.

Other supplies I used are:

**Card stock from Gina K Designs and Club Scrap.

**An embossing folder from Darice for the background.

**Sentiment stamp is from Club Scrap (“Polynesian” kit)

**polka dots on pink background are a stamp from Club Scrap (“Tilescapes” kit).

**I used VersaMark ink to stamp the sentiment, Wild Dandelion ink from Gina K. Designs to color the velum layer, and Club Scrap ink in Carnation to stamp the polka dots, and Leaf to edge the background panel.

**Sentiment was embossed with Leaf embossing powder from Zing.

**I used some Sparkle Silk from Fun Stampers Journey to add a little shimmer to the plumeria.

**the enamel dots came in my Scandinavia kit from Club Scrap.

**ribbon was upcyled and altered with Copic Marker G14.

I will be sending this card off to the Card Care Connection. Hopefully it will bring a smile to someone who could use one.

Thanks for stopping by!

Friday, October 27, 2017

Copper And Gold

Did you ever have “one of those” days?  Well, I had “one of those” projects.  When I saw the current challenge (copper and gold) on Rubbernecker Stamps I immediately got a vision of what I wanted to do.  When I saw this week’s sketch at Freshly Made Sketches
…that vision became even clearer.  Implementing that vision was another story.  I just kept pushing through my personal challenges (which I won’t bore you with) to come up with this anniversary card:
The “pattern” paper was created by stamping the Marble Swirl background stamp from Technique Junkies with Perfect Pearls Medium onto black cardstock, then dusting with both Perfect Gold and Biscotti Perfect Pearls.

The two part butterfly stamp is from Rubbernecker Stamps.  I just stamped the outline part with VersaMark ink, then embossed using a blend of embossing powders - Earthtone Paprika from WOW and Cleopatra’s Copper from Lindy’s Stamp Gang – to try to get the color to be a closer match to the card base.  I then painted in the butterfly using the Perfect Gold Perfect Pearls mixed with a little water.

The sentiment stamp is from I Break For Stamps, stamped onto ribbon using Jet Black StazOn ink.  The ribbon itself was a piece of upcycled white ribbon that I altered using a blend of Rusty Hinge and Antique Bronze Distress Stain to again make it a better color match.

Other supplies I used are:

**The card base is Copper cardstock from Gina K Designs.  The gold paper layer under the butterfly is some handmade silk screen papers that I found at a Papersource store in Brookfield WI.   All other paper is from Club Scrap.

**the nailheads are from Mark Richards.

No matter what challenges you may encounter, don’t give up! Things can still turn out, it just may take a little longer than planned.

Thanks for stopping by!

Wednesday, October 25, 2017

"Scandinavian" Perpetual Calendar

If you have read my blog before, you know that I have mentioned many times how fast time is going by.  I’ve decided to try to do something about it this time.  I followed this tutorial that I found on SplitcoastStampers and used my Club Scrap Scandinavia Lite Kit to make a perpetual calendar:
It was pretty easy to put together.  Instead of stamping the numbers, I used the Alpha stencils from Club Scrap.  I inked them using Ash Club Scrap Hybrid Ink, traced them with a black marker to add definition, inked again with VersaMark ink then used Oakleaf Olive embossing powder from Lindy’s Stamp Gang to emboss.  The tags were cut out using a Label Stacklets 3 die from Taylored Expressions, and edged with a metallic gold Faber Castell Pitt pen.

Most of the supplies I used came from my Scandinavia Lite kit.  The little owl and the “one awesome day” tag were cut out of a couple of the cut-a-part embellishments included in the kit.  The sparkle dots were also included, but you can purchase them separately here.  I didn’t have the correct size jump rings, so I used some loop rings I had left over from making wine charms a long time ago.

I’m thinking that if I don’t turn the numbers every day, maybe time will slow down?!?  I know…I won’t hold my breath.

If you find yourself with a few extra minutes, go check out the Club Scrap blog hop featuring this months Scandinavia kit.  You just might be inspired!

Thanks for stopping by!

Wednesday, September 27, 2017

Orchard Wreath


Can you believe it is the end of September?   If anyone knows how to slow down time, you could make a fortune by sharing that trick!  The end of the month means it is time for the Club Scrap Monthly Blog Hop and Linky Party!

While looking through the tutorials at SplitcoastStampers I found a cool wreath card made from a pine needle die.  I don’t have a die like that, but I decided I like the wreath idea.   So, after looking at what dies I do have, I used my Orchard Lite supplies to make this:
It was actually pretty easy to put together, just a little time consuming.   I started by using my Creative Memories Cutting System to cut a wreath shape out of chipboard.   I covered it front and back with paper.  Then I put my BigShot to work.  I used the “Leafy Branch” die from Taylored Expressions along with the similar but smaller branch die from this Taylored Expressions die set to cut out many “branches” of both sizes out of various colors of the Orchard papers.   I inked all of the edges using either Mowed Lawn Distress Ink or Ruby ink from Club Scrap.  I also added some “veins” using the really cool white gel pen that came with my kit.

After placing a layer of the smaller branches around the base, I added a layer of the larger branches, alternating between the four colors I had cut.  I then filled in some of the gaps with more of the smaller branches.  That whole process was made easier by using my handy-dandy needle-tipped applicator filled with bookbinding glue (both from Club Scrap).

I stamped a sentiment from Club Scrap’s Blossom kit (no longer available) onto one of the chalkboard stakes included in my kit using Club Scrap’s Parchment Pigment ink.  I also altered the stake using Wild Honey and Dried Marigold Distress Stains.   I finished off the wreath with a bow made from some of the ribbon included in my kit, and some “gems” from a past Club Scrap kit (I’m sorry that I don’t remember which one) altered with YR04 Copic Marker.

Wishing all of you a cool and crisp autumn!

Thanks for stopping by!

Sunday, September 24, 2017

Shimmery Christmas

I recently discovered the Freshly Made Sketches blog and decided to give this week’s sketch a try.  As an extra challenge (especially for me), we are asked to keep our project “clean-lined and fresh”.  Here is this week’s sketch:
Here is my interpretation:
The panel behind the tree started out as a blue piece of cardstock.  I covered it with some Tim Holtz Idea-ology Frosted Film (which sadly doesn’t seem to be available anymore), then pounced it with Botanical, Honeycomb, Stream and Gold Mixative alcohol ink.

I also wanted to join in the Simon Says Stamps Monday “Shimmer and Shine” Challenge, so I used some gold silk screen paper that was hancrafted by Women co-operatives in Nepal.  I found a pack of it at Paper Source in Brookfield, WI.  I also used some Honey Gold Nuvo Glitter Drops on the tree (which didn’t show up very well on the picture) and to create my own embellishment “dots”.

Other supplies I used are:

**The papers are from Gina K Designs, and Club Scrap.

**The Christmas tree stamp is from Taylored Expressions, the sentiment stamp is from Gina K. Designs.  Both were stamped with VersaMark ink and embossed with Gold Zing powder.

**the fiber is from Club Scrap’s “Shades of Winter” kit.

**the star brad is from my stash, altered with Copic Marker YR14.  I also used Mowed Lawn Distress Marker to edge the "joy" flag to give it a little more definition.

Thanks for stopping by!

Sunday, September 17, 2017

Make Me Smile

I bought a big roll of Tim Holtz Idea-ology Frosted Film a long time ago.   I loved the idea of it at the time, but it has just sat on my shelf because I wasn’t quite sure how to actually use it.   Recently I stumbled upon THIS post on the Classroom blog at Ellen Hutson.  I gave the technique a try and fell in love!  The sad thing is, I’m not sure the Frosted Film is being sold anywhere anymore.  Good thing I have a lot left!  Here a couple of background panels I made with some alcohol inks and Frosted Film:
I turned both of the backgrounds  into cards.  The first one I made for the Rubbernecker Stamps “Make Me Smile” challenge:
The background started with a piece of dark blue cardstock covered with the Frosted Film.  I then pounced on Watermelon, Sunset Orange, Citrus and Pearl Mixative Alcohol Inks.  I altered a scrap piece of silver velum using some Oregano Alcohol Ink, stamped the sentiment with Distress Embossing Ink and embossed with Primary Burgundy Red powder from WOW.  (My apologies – I’ve had that sentiment stamp a long time and don’t know where it is from).

The butterfly image is a two part stamp from Rubbernecker Stamps, stamped on another scrap piece of velum.  I used Wildberry ink from Palette and Topaz ink from Club Scrap on the solid “watercolor” part of the stamp. For the outline, I first stamped with Forest Moss Distress Ink then again with Distress Embossing Ink (the MISTI is great for double stamping!).  I then embossed using Oakleaf Olive powder from Lindy’s Stamp Gang.  When all that was done, I fussy cut the image and used some Multi Medium Matte glue to glue it on to the card.  That is one aspect about the Frosted Film that I’m not crazy about – only a good liquid adhesive will work when attaching something to it.

I also make a quick Christmas card with the other panel:
I used a variety of alcohol ink colors on this background, but I’m afraid that I didn’t write the colors down.  The tree is a die from Taylored Expressions, and the sentiment is from the Gina K. Designs Christmas Joy stamp set.

Other supplies I used are:

**The base papers are from Gina K Designs, all others are from Club Scrap

**Majestic Purple Liquid Pearls used as “ornaments” on the Christmas tree.

**Midnight Blue StazOn Ink used to stamp the Christmas sentiment.

**The fibers and eyelets are from my stash.

Thanks for stopping by!

Monday, September 4, 2017

Quick Masculine

Gina K. Designs’ Stamp TV forum is running a challenge this week to do a card with a masculine theme.  Perfect!  The next four cards on my list to make are all for men.  My initial inspiration came from this Stamp TV post by Sean.  It has been quite a while since I had a card go together as quick and easy as this one:
I started with a background made during a recent play session with my Color Bursts (Sap Green, Chartreuse, Terre Verte, Pthalo Green and Verdi Gris Liquid Metals used for this panel).  The three trees are from the Gina K Designs “Autumn Wishes” stamp set, and the sentiment is from the GKD “Grand Greetings” set.  All of them were stamped with VersaMark ink, then embossed using some Copper Foil embossing powder from Club Scrap (no longer available).

Other supplies I used are:

**The card base is Copper Metallic card stock from Gina K (I Love This Paper!), the other paper is from Club Scrap.

**The brown ribbon came with a Gina K Designs kit a long time ago, the green ribbon is from Elen Hutson.

**The little “metallic” charm was cut out using a Spellbinders “Ribbon Buckles” die. The brad is from my stash.

Thanks for stopping by!

Wednesday, August 30, 2017

Make Waves

I love the August “Lagoon” kit so much that when I was at the Club Scrap Retreat a few weeks ago I had to buy the Deluxe kit to tide me over until my Lite kit arrived.  When it came time to decide on a project to add to the Lagoon Blog Hop and Linky Party, I revisited a couple of projects that I did in past retreats, combined the techniques and came up with this custom frame:
I started by re purposing a couple of frame mats and some chipboard.  I glued the mats together, then added torn strips of paper, only gluing them down on top, wrapped around to the inside and wrapped across one short side.  After adding a couple of narrow piece of chipboard to three outer edges of the frame that were not fully wrapped yet, I glued another piece of chipboard to the back (It was covered with a piece of stamped white paper to make it look better if there is no picture).  Then I finished wrapping the torn paper around the whole sandwich.  All of that created the frame with backing, and a slit to insert the picture.

The next step was to make a mixture of Club Scrap Bookbinding Glue, Club Scrap Sapphire re-inker and water to create a “veneer stain”.  I brushed that on using a foam brush and “quick” strokes.

The hardest part of this project for me was the back.   I wanted this frame to stand alone like a store bought desk frame.  (Quick disclaimer - I am not an engineer of any kind!)  I cut out a “leg” using some scrap chipboard.   Using another piece of chipboard, I scored and folded a “hinge” about 1/3 of the way from the top.   I attached the leg to the longer part of the hinge and wrapped it with some of the tan paper from the kit.  I took a piece of the tan paper that was cut to fit the back of the frame, cut a slit in the appropriate place and slid the shorter piece of the hinge in after adding glue to the hinge flap.  Then I glued the whole contraption to the back of the frame. Here is what it looks like:
I finished off the frame by using VersaMark ink and Cobalt Antiquities embossing powder to emboss the sentiment (from the Lagoon Art Nouveau stamp set) on a tag from my kit. I then sponged on a light coat of Tumbled Glass Distress ink, sprayed it with some Perfect Copper Perfect Pearls Mist and distressed the edge using Club Scrap Sapphire ink. It is topped off with a copper snap from my stash.

In the opposite corner I used a charm and “fish scale gem” which was included in my kit.  I altered both of them using Terra Cotta, Caramel and Copper Mixative Alcohol inks, along with some blending solution.

All papers used for this project came from the Lagoon kits.  (If you haven't got yours yet, you better hurry and check it out here!  This kit won't last long.)   The inspiration for this project came from two different past retreat workshops - the “Magnetic Bulletin Board” from 2013, and the “Paper Veneer” from the 2009 Anniversary Cruise.  Thanks Jacqueline Carney and Terri Zwicker for helping with this project too!  Those Club Scrap Retreat weekends are so worth it.

Thanks for stopping by!

Sunday, August 20, 2017

Playing Like a Mad Scientist

Sometimes it is just plain fun to experiment.  I did just that for this month’s Technique Challenge at Club Scrap - heat embossing on dark colored paper.

Once I picked the papers and image that I wanted to use for my card, I realized that I didn’t have an embossing powder color that matched my palette.  I really liked where this card was going, so rather than change my papers, I did some research and found out that it is possible to custom make embossing powder colors. So I gave it a try:
To create your own color, you have to use clear powder and some type of alcohol ink.  Any other liquid form of color (such as re-inkers) do not work.  Trust me, I just had to try even though everything I read told me it wouldn’t work.  It also seems to work better with the clear powder.  I tried it using some white powder with some success, but my experiment was pretty convoluted by that point so I don’t trust the results. I might revisit that again sometime in the future.

Here is the finished card:
The focal image is a Club Scrap stencil from “Shades of Winter”. The whole image was inked (in steps) using Club Scrap White Pigment ink.  The stems were embossed using Club Scrap Blue Satin embossing powder.  The berries were embossed using my custom blend made from WOW Clear powder and Raisin Adirondack alcohol ink.  (Because of starting with clear powder, it is important to use the white ink underneath if it is on dark paper.)

Other supplies I used are:

**Paper from Club Scrap and Gina K. Designs.

**The focal image panel was die cut using a Taylored Expressions “Label Stacklet 3” die.  It was edged with Picket Fence Distress Marker.

**The sentiment stamp is from Club Scrap’s “Cherry Blossom” kit, stamped with VersaMark ink and embossed with Denim Zing embossing powder.

**The sentiment tag is from Die Versions.

**The pink ribbon is upcycled, the other ribbon is from Club Scrap’s “Pure & Simple” kit, altered with Copic Marker B21.

**The edges of the pattern paper were inked using Chipped Sapphire Distress Ink.

**The gems (altered with Copic B21) and the brads (altered with Copic B39) are from my stash.

I followed the sketch for this month's Club Scrap Sketch Challenge.  You can check out the original here.

Thanks for stopping by!

Friday, August 18, 2017

Let’s Get Leafy

This week Stamp TV is challenging everyone to create a background that utilizes leaves.  I quickly thought about the new Gina K Designs Foliage stencil that I recently acquired.  Here is what I came up with:
I mixed some Jelly Bean Green ink from Gina K. Designs with Ranger Texture Paste and spread it over part of the stencil.  After that dried, I added the final “sprig” and repeated the drying process.  A little bit of Stormy Sky Distress ink on the edges and my background was good to go.

I stamped the flower from Gina K. Designs’ “Boho Flowers” with the Jelly Bean Green ink and embossed it with Spring Leaf Chartreuse powder from Lindy’s Stamp Gang.  It didn’t have enough contrast, so I stamped it again (thanks to my MISTI) using Ivory Gina K. ink and the same embossing powder.  Better, but still not what I was looking for.   So, I started over with just the Ivory and the embossing powder.  Bingo!  I fussy cut them both out and stacked them together for the focal image.    Don’t give up too easily on something that doesn’t turn out exactly like you imagined!

Other supplies I used are:

**Paper from Club Scrap

**The sentiment stamp is from Gina K. Designs’ “Autumn Wishes”, inked with Stormy Sky Distress ink and embossed with Gina K.’s Fine Detail Clear embossing powder.

**The ribbon is upcycled, altered with Stormy Sky Distress Marker.

**The gems came with my Club Scrap “Paradise” kit.

Thanks for stopping by!

Saturday, July 29, 2017

Anything Goes with Koi

The Simon Says Stamps Wednesday Challenge for this week is Anything Goes.  Sometimes that stresses me out…you know, way too many options.  This time, I did ok with it.  I just jumped in and played around until I came up with this card:
I created the background with Sea Glass, Electric Blue and Dragonfly GlimmerMists and Ranger Watercolor paper.  When spraying each color, I tried to keep them each to 1/3 of the panel, or at least as much as I could control those little flying drops of color!  In the end they blended better than I expected.  Once it was dry, I used a background stamp from Technique Junkies and Library Green Archival Ink to add the swirls.   As a final step, I dry embossed it using an old Cuttlebug folder.

Other supplies I used are:

**Paper from Gina K. Designs and Club Scrap.

**The sentiment stamp is from Gina K. Designs, inked with Versa Mark, embossed with Lindy’s Stamp Gang Midnight Emerald powder and cut out using a Spellbinder Deckled Rectangles die.

**The Koi fish die is from Elizabeth Craft Designs.

**The ribbon is from Club Scrap’s “Garden Shed” kit.

Thanks for stopping by!

Friday, July 28, 2017

Video Inspiration

Stamp TV has over a library of over 950 videos filled with different techniques and all kinds of inspiration.  I have long been a fan and have learned many new techniques from watching these gems.  This week’s Stamp TV challenge at Gina K. Designs is to make a card inspired by one of the videos.  My personal challenge was to find one that I haven’t “used” before.  My card ended up being inspired by not one but two of the videos.  I used the “Highlighting and Edging with Emboss Resist” technique and also “Creating a Metallic Embellishment” to create a Christmas card:
I was also inspired by Simon Says Stamp’s Monday challenge “You’ve Got the Edge”.  The background panel was first inked through a Simon Says Stamp stencil with Gina K. Designs Cherry Red Ink, then cut out with an old die from Spellbinders.  I traced the edge with VersaMarker Pen, then embossed it using Zing Metallic Gold embossing powder.

The focal image is from Gina K. Designs, stamped with VersaMark ink and embossed using Stampendous Ivory powder.  I used three sizes of We R Memory Keepers Nesting Ovals dies, coating the largest with VersaMark ink and Zing Metallic Gold embossing powder.   I embossed a Spellbinder Fancy Framed Tags Two die embossed with the Zing Gold powder, cut it in half and added it behind the largest oval for a little extra flair.

Other supplies I used are:

**Paper from Gina K. Designs and Club Scrap

**The sentiment stamp is a die from Die-Versions that was coated in Versa Mark ink and embossed with Zing Metallic Gold powder.

**The ribbon is from Club Scrap’s “Sunflowers” kit.

Thanks for stopping by!

Thursday, July 13, 2017

Creating a Vintage Look

I spent a good part of today just playing in my craft space and it was a much needed boost for my crafting mojo.  I started with my Color Bursts and some stencils, a technique that was new to me.  I wasn’t totally satisfied with the results, but I really liked the color combination on one panel.  After messing with it a bit I came up with this anniversary card:
The background panel consists of Burnt Orange and Sepia Color Bursts, with some Suede Glimmer Mist sprayed on top.  Ok, I liked where this was going.  I used a Tim Holtz background stamp and some Ranger Tarnished Gold embossing powder.  Oops…it seemed to take a wrong turn.  Not willing to give up yet, I stamped it again (easy to do thanks to my MISTI) and tried some Midnight Copper embossing powder from Lindy's Stamp Gang right over the other.  Cool! It reached a destination that I was happy with.  Persistence really can pay off!

The rose is a two part “watercolor” stamp from Rubbernecker Stamps.  I used Gina K. Designs Sweet Mango and Wild Dandelion ink for the solid part, and Gina K.’s Dark Chocolate and StazOn Olive Green for the outline.  The leaves and stem were colored in with a little Pine Needles Distress Marker mixed with water.

All along I was trying to make a “vintage” looking card for the current challenge on the Rubbernecker Stamps blog.  I don’t have any pattern paper, and I don’t have any stamps that look vintage, so I had to get creative.  I love the way the card turned out, but I wasn’t sure if it was very “vintage-y”. While searching for something in my stash, I came across an old tag that was printed with a cool lacy type image.  I added some Pewter Perfect Pearls Mist to it which made it look a little like some shimmery parchment paper.  Since “vintage” goes together with “nostalgia” which ties directly into “Christmas”, I turned it into a Christmas card:
The candles are another two part “watercolor” stamp from Rubbernecker Stamps.  I colored the solid stamp with Spiced Marmalade, Candied Apple and Pine Needles Distress Markers, and stamped the outline with Tuxedo Black Memento Ink

Other supplies I used are:

**Paper from Gina K. Designs and Club Scrap.

**The anniversary card sentiment stamp is from I Break For Stamps, stamped with Distress Embossing Ink and embossed with the Midnight Copper EP from Lindy’s Stamp Gang.  It was cut out using a Spellbinders Petite Labels One die.

**I created the “Joy” sentiment on the Christmas card by using an old alphabet stencil (not even sure which company to credit).  Keeping with the “vintage” theme I went old school and used a Candied Apple Distress Marker to trace and color in the letters.  The tag was cut out using a Spellbinders Fancy Framed Tags Two die.

**The heart on the anniversary card was cut out using a Taylored Expressions Pocket & Pages die, then embossed with the Midnight Copper EP from Lindy’s.

**I used some Tea Dye Distress ink on the edge of the rose, and some Candied Apple Distress ink on the edge of the Christmas card.

**The ribbon is from Club Scrap (brown from the Aurora Borealis kit, red from the Boardwalk kit).

**Gems and nail heads are from my stash.

Thanks for stopping by! (Sorry for the long post.)

Saturday, July 1, 2017

Thanks…”Turtally”!

Living in Hawaii definitely has its perks.  One of my favorites is the ability to walk along a rocky shore near my house and watch the Honu (turtles) playing in the waves.  After one of those relaxing walks this week, I was inspired to make this card:
It was love at first sight when I saw this turtle stamp from Technique Junkies.  I have seen (and own a few) really cool turtle stamps so I don’t know what it was about this one that had me adding it to my shopping cart before I could say “I’ll take it”.

This week’s Monday Challenge at Simon Says Stamps told me to “stencil it” so that is what I did for the background.  I started by sponging four colors of Distress ink (Cracked Pistachio, Mowed Lawn, Salty Ocean and Chipped Sapphire) onto a white piece of card stock. I placed a swirl stencil from Hero Arts over the inked piece and lightly spritzed it with Electric Blue Glimmer Mist. After a quick blot with some scrap paper and letting it rest for a minute to soak in, I lifted the stencil and had a slightly shimmery, swirly, watery looking background.

My Honu friend was stamped with Distress Embossing ink and embossed with Midnight Emerald powder from Lindy’s Stamp Gang. I mixed some Perfect Pearl, Perfect Gold and Forever Green Perfect Pearls with a little bit of water and painted on to make him shine a little more.

Other supplies I used are:

**Paper from Club Scrap

**The sentiment stamp is an old one from Stampin’ Up, stamped with Distress Embossing ink and embossed with the Midnight Emerald EP from Lindy’s Stamp Gang.

**The tag was cut using a die from Die-Versions (but it doesn't seem to be available anymore).

**I used a little Library Green Archival ink to distress the edges of the tag.

**The ribbon is from Club Scrap (All That Jazz kit) and the brad is from my stash.

Thanks for stopping by!

Wednesday, June 28, 2017

Pattern Play Linky Party

I am happy to once again be joining in on the fun at the Club Scrap Blog Hop and Linky Party to celebrate June’s “Pattern Play” kit. Using only paper from my Club Scrap Pattern Play Lite kit, I made a couple of cards – one is for an upcoming birthday, and the other will have to wait a little longer to be used:
I followed the cutting instructions on the Jack of Diamonds card from Club Scrap’s Cardmaking Idea Deck 1, which makes two pop up cards.  I sponged Ruby Club Scrap ink onto the “swirl” paper background, then lightly spritzed it with some Pearl Mica Spray from Ranger.  The angel is a die cut from Die-Versions, cut from the “plain” white paper, which actually has a subtle pattern to it.  When I painted the angel’s dress with Lime Green Color Burst, the pattern really came through!  I smudged a little bit of Dried Marigold Distress Ink onto her face, then painted the rest with some Platinum Liquid Metals from Color Burst.  I mounted her onto a black circle sprayed with the Pearl Mica Spray.  I stuck to the design intent for the Christmas card, adding a cut out circle message to the pop up part:
For the birthday card, I used the plain side of the swirl paper for the background.  I added some strips of the washi tape included with my kit, embossed it using a folder from Darice, and distressed the edges using Ash Club Scrap ink.  I went a little wild and followed an idea that I found on pinterest to create a “cake” to pop up:
Other supplies I used are:

**Both stamps on the birthday card are from the Club Scrap “Tribal” kit.  The cover sentiment is stamped with Onyx Black Versa Fine ink and embossed using WOW clear embossing powder.   The inside sentiment is stamped with Black India ink from Club Scrap.

**The pop up sentiment on the Christmas card is from Gina K. Designs and the Happy Holiday stamp is from an old Club Scrap stamp set.  Both are stamped with Ruby Club Scrap ink.

**I used Neon Green Club Scrap ink to distress the inside panel and pop up of the Christmas card.

**The ribbons on both cards came with my Pattern Play Lite kit.

**Besides the angel die, I also used dies from Taylored Expressions (birthday card cover), Spellbinders Classic Circles (angel backing), Spellbinders Classic Scalloped Circles (Christmas card pop-up), and Spellbinders Parisian Accents (inside of Christmas card – top corners).

**The black nailheads on the birthday card are form Mark Richards, and the green gems on the Christmas card are from my stash.

I have been trying to “decorate” the insides of my cards more…making pop up cards really forces you to do that.   It was fun though!

Thanks for stopping by!

Saturday, June 24, 2017

Pencil Roll to Treasure Map Journal

At the Club Scrap Retreat back in 2014 one of the gifts we received was a very cool pencil roll.  It was made from a suede like material and came complete with a cool charm on the tie closure.  Fast forward to a few months ago when I was cleaning and organizing my play space and found this item.  At that time, I also remembered seeing this post from Tricia Morris about how to turn this holder into a “Treasure Map Journal”.  Since I didn’t seem to need the holder, I decided to try this project for myself:

I used cardstock from my stash for the signature covers.  I didn’t have enough of any one kind of text weight paper for the inside pages, so I went to Office Max and found this really cool Ivory Parchment Letterhead from Gartner…perfect for the pirate/treasure map theme of the project.

To help enhance the pattern on the cover I brushed on some Glimmer Mist spray, wiped off the excess, then heat set.  There was a flap on the inside that I cut off to make room for sewing in the signatures.  I altered that extra piece with some Tarnished Brass Distress Stain, then used Blazing Red Staz-On ink to stamp the compass stamp from I Break For Stamps.  The image was cut out using a Spellbinders “Fairmont Labels” die.

Other supplies I used are:

**The ship stamp on the inside signatures is from Club Scrap “Navigation” kit. It is stamped with Mahogany Club Scrap ink. I also used the Mahogany ink to distress the signature covers.

**The “chapter” cut-a-parts are from Club Scrap’s “Literature” kit. 

**I used Club Scrap Bookbinding Glue to adhere the panels on the cover, and wax linen tread from my stash to do the sewing of the signatures.  

Now I’m looking around wondering what else I can re-purpose in a cool way…

Thanks for stopping by!

Friday, June 16, 2017

Tribal Texture

I love, love, love using texture pastes with stencils. But masks?  I usually am a little stumped about how to use them with any technique.  Until this card:
I pulled out my Club Scarp mask from the “Tribal” kit to see what I could do.  I tried to do an hombre effect by mixing Ranger Texture Paste with Club Scrap Re-inkers – Ruby in the middle, Tangerine next and Topaz on the outside of the image.   I was surprised at how easily the three colors blended together.

I was expecting some good contrast between the colors of the paste and the black cardstock, but after letting it dry, I was disappointed. So, I put the mask back on and hit the whole thing with some Buttercup Mica Spray from Ranger. That not only brightened up the image, it added a cool bit of sparkle.

The other supplies I used to finish this card are:

**Paper from Club Scrap

**Stamp is from Club Scrap “Literature” kit.   It is stamped with VersaFine Onyx Black ink and embossed with Gina K. Designs Detail Clear embossing powder.

**Ribbon is upcycled and is altered with Black Copic Marker

**The heart dies are from Spellbinders (but I don't think they are available anymore).

**The small heart is covered with Glossy Accents, the large heart is distressed with Ruby Club Scrap Ink

I am submitting this card for both the Simon Says Wednesday Challenge, “Emboss It” challenge and for Club Scrap’s June Technique Challenge.

Thanks for stopping by!

Thursday, June 8, 2017

Graduation

Is it just me, or do graduation announcements make you feel old?  This week I received two high school graduation announcements and I started reminiscing about holding both boys when they were babies. It made me wonder where the time went, and if I am really getting that old! Yikes!

Anyway, putting those oversentimental thoughts aside, I had fun making cards for the two proud graduates:
I am submitting these cards for the Club Scrap NBUS (Never Before Used Stuff) challenge which is to use a large sized pattern stamp or stencil. I used the stencil from “Full Circle” with a mixture of Club Scrap Metallic Gold re-inker and Dreamweaver Pearlescent Embossing Paste on the red/purple panel.

Other supplies I used:

**Paper from Gina K. Designs, Club Scrap, and Tim Holtz Idea-ology Deco Sheets (gold glitter paper)

**Stamps are from Club Scrap (sentiment from “Mosaic Twist”, image from “Graduation”). Both stamped with VersaFine Onyx Black ink and embossed with Gina K. Designs Detail Clear embossing powder.

**Ribbon (edging red/purple panel) from Club Scrap

**Enamel stars are “Candy Bonbon” stickers from Mark Richards

I am also submitting these cards for the Simon Says Stamps Wednesday Challenge: “Make It Masculine”. Good thing both graduates are boys!

Thanks for stopping by!

Friday, May 12, 2017

On the Edge Snarky

There are so many great challenges out there that I love being able to make one project that qualifies for two or more at once.  Here is my card that fits for two May Club Scrap challenges:
The NBUS (Never Before Used Stuff) challenge is to use a snarky or funny sentiment stamp.  My sentiment (“Today is the last day of some of your life” – with “uggh…happy bday!” inside) is from the Club Scrap kit Comics. It is stamped on a scrap piece of vellum using Jet Black Staz-On ink.

The Technique challenge is to stamp and cut an edge border for your card.  I used a stamp from the Club Scrap kit BandanaRama. After stamping it three times with Ivory Gina K. Designs ink, I embossed it using Clear WOW powder.  I then fussy cut along one side and mounted it onto my black card base.

The other panel is an art orphan from my stash (yes, I am still trying to use them up while waiting to have more time to play around making new ones). The focal image is the same Club Scrap stamp that I used on the edge.  This time I stamped with Distress Embossing ink, and embossed using Midnight Gold powder from Lindy’s Stamp Gang. I colored the image using Liquid Pearls (Daffodil, Key Lime and Flamingo) and a paintbrush with just a hint of water. The image is fussy cut and edged with a black Copic marker to even out my not so great cutting.

All the paper came from Club Scrap. The “gems” came from the Club Scrap kit Paradise. The ribbon is upcycled. The stamps that I used are no longer available, but Club Scrap has other fun stamps. If you have a couple of minutes, click here to check out what is available now.

Thanks for stopping by!

Sunday, May 7, 2017

A Hint of Pink While Nesting

Simon Says Stamps Wednesday Challenge is “A Hint of Pink”. I am not opposed to pink, but it is not one of my favorite colors, so using just a little bit of it is good for me. I created a set of nesting boxes using the 9 of Spades from Club Scrap’s Assembly Line Cardmaking Idea Deck Volume 2:

These two boxes were made from one 12x12 piece and two 8.5x11 pieces of card stock.   All the paper and stamps used for this project are from Club Scrap. The other supplies used are:

**The pink flowers on the box tops are Prima Flowers that were white. I colored them pink by mixing a few drops of Picked Raspberry Distress re-inker with some water and “painting” the mixture onto the flowers. The yellow flowers are from Michaels. The brads are from my stash.

**I used Distress Embossing ink to stamp the images on the side panels of the boxes and followed that up with WOW Clear embossing powder.

**Mowed Lawn and Mustard Seed Distress ink was used to ink the edges of the side panels.

**The pink ribbon is from Ellen Hutson.

**The bling is from my stash, altered with RV29 Copic Marker to match the other pink colors.

The Idea Decks from Club Scrap are fabulous! You get 52 cards, each with detailed cutting instructions and patterns, most will make two or more cards (or sometimes gift boxes like this one). They are a great way to jump start your projects. Right now they only have this deck in stock, but I am hoping that they get the others back soon. Oh, and they have Scrapbook Layouts decks that I hope will be coming back in stock too!

Thanks for stopping by!