Wednesday, November 30, 2016

Gifts from Paradise

Happy belated Thanksgiving! I hope everyone is recovering from a lot of family, fun and eating. Now, it is time to face the holidays head on. I needed a couple of little gifts to help fill in my list. The bright, cheerful colors in Club Scrap’s Paradise collection proved to be great inspiration for what I needed. (All the supplies I used for these projects came from my Paradise Lite kit except where noted.)

First I made a couple of fancy “notebooks”:
It was so exciting to find 5 x 8 inch Post-It Note Lined Notes in neon pink and orange…a near enough perfect match to the colors of the Paradise Lite papers. I used Club Scrap ink in Neon Pink and Neon Orange to alter the ribbon color to match. The “a good life…” stamp is from Club Scrap "Celebrate". It was stamped with the neon pink ink and embossed with Gina K. Designs Fine Detail EP in Clear. The flowers and the bling brads are from my stash (I’ve been on a “use up old products” kick!).

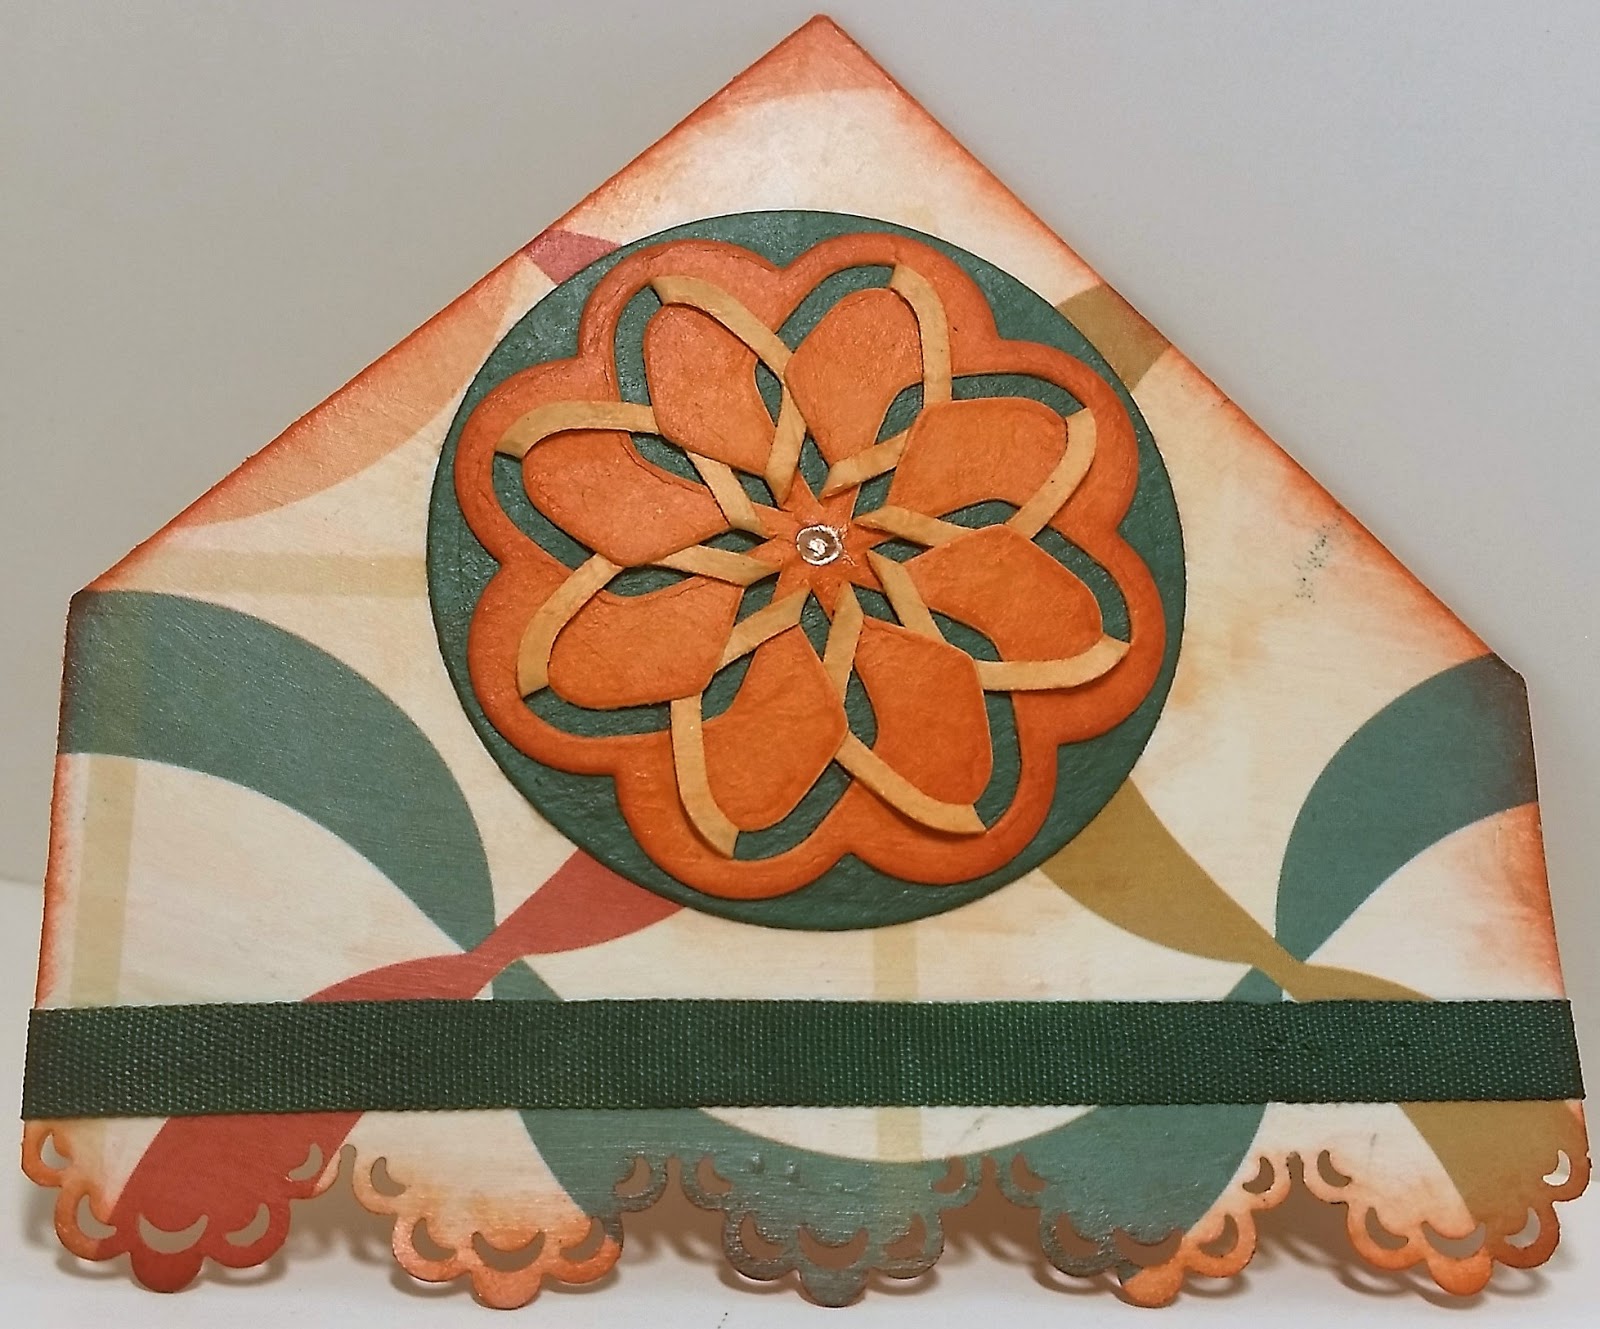
I also made a couple of gift card holders. The first one was inspired by a project that I found in my ScrapRap from “Birds of a Feather” (Sept. 2009):
It doesn’t show up in the picture (because I didn't get a shot of the outside!), but I stenciled the outside with Neon Orange through a Memory Box "Peony Blossoms" stencil just to add a little texture. I stamped the inside with the Neon Orange using a background stamp from Club Scrap “Castaway”. The sentiment stamp is from Club Scrap “Holiday Tags”, stamped with Neon Blue ink. Again, the flowers and bling are from my stash.

And last I made this gift card holder:
I got the idea from SplitcoastStampers. The flower is a stamp from Decola Hancoline (which I got at my local Ben Franklin Craft store) colored with Twisted Citron, Squeezed Lemonade and Carved Pumpkin Distress Markers. The sentiment was stamped with the Neon Pink ink. This is my new favorite way to give a gift card...so quick and easy to make, but dresses the gift up so much!

If you have some time, you should pop over to the Club Scrap Blog Hop and Linky Party to check out all the fun and creative projects!

Thanks for stopping by!

Thursday, October 27, 2016

“Just A Touch” Challenge

Ok, this was a fun challenge. Over at Gina K. Design’s Stamp TV, they put out a challenge to use just a touch of red on a card. Oh the possibilities! I ended up making a birthday card for my Father-In-Law:
The supplies I used are:

**paper is from Gina K. Designs (base) and Club Scrap.

**leaf stamps and sentiment stamp all from Gina K. Designs “Autumn Wishes”.

**embossing folder for background is from Tim Holtz Sizzix.

**Gina K. Designs Ink in Charcoal Brown (sentiment and distressing edges) and Red Hot (red leaf), VersaMark Ink (gold leaves).

**gold Zing embossing powder (gold leaves) and Fine Detail Clear Gina K. Designs embossing powder (red leaf and sentiment).

**ribbon is from my stash, altered with Tsukineko Java Walnut Ink spray.

Thanks for stopping by!

Wednesday, October 26, 2016

“Literature” Reading Journal

In the sneak peek for this month’s Club Scrap Lite kit, I saw a cut-a-part quote that all but screamed at me what to make for the October Blog Hop and Linky Party.
My daughter has always been a voracious reader. I have a very fond memory of her at about age five sitting in the kitchen reading “Green Eggs and Ham” to me while I was cooking. Before she moved out on her own, she used to have a stack of books to be read that was taller than her. So, using inspiration from Terri Zwicker’s “Field Journal” workshop that we did at the 2011 Club Scrap Retreat (with my own modifications), I made this journal for her:
All the paper, and most of the other supplies came from my “Literature” Club Scrap Lite kit. To start, I created a document with information to record (Title, Author, Pages, Started, Finished and Notes). I used some cardstock from Staples to print out enough copies, front and back, to make the signatures. After putting the book together, I embellished it inside and out using the cut-a-parts, the “Literature” stencil, and a “Dots” stencil from Stampinback
 Other supplies I used are:

**Ruby, Earth and Mahogany Club Scrap Ink.

**wax linen thread which I have left over from various Club Scrap projects over the years.

**Glossy Accents from Ranger was used to highlight the books on the cover cut-a-part quote…the one that “told” me what I had to make!

One more note:  If you went to either of the Club Scrap retreats this year, you know that Tricia came up with an invaluable tool to use when doing piercing for bookbinding projects.  My new Piercing Cradle made creating the signatures for this book so much easier, and the results so much better!  If you haven't got one and like to do book binding projects. you really should check it out!

Thanks for stopping by!

Saturday, October 15, 2016

Embossing Technique Challenge

I am a “technique” junkie, so I love Club Scrap’s monthly Technique Challenge. This month’s challenge is to dry emboss something.  I decided to try out a new (to me) technique and came up with this card:
My background was done using the “Resist and Reveal” technique found on the “Emboss or Die” CD from Technique Junkies. The patterned paper is from Club Scrap’s “Garden Shed” kit. (If you look closely, you can see the pattern on the bamboo.) I used a brayer to spread Distress Embossing Ink onto the raised portion of a bamboo embossing folder from Darice, ran it through my BigShot, and covered it with clear powder from WOW. After heating it, I sponged on Sapphire Club Scrap ink.

The other supplies I used are:

**all the paper is from Club Scrap.

**sentiment stamp is from Club Scrap “Moroccan Spice” (I split the sentiment – inside it says “ but younger than tomorrow”), stamped with Sapphire Club Scrap ink. 

**The focal die is from GEO, the bamboo dies near the sentiment are from Spellbinders (“Scruffy Panda”)

**ribbon came with my Club Scrap “The Blues” kit.

**the bamboo near the sentiment was colored with Copic Marker YG99

**the brad is from my stash, altered with Copic Marker (but I don’t remember which color).

Thanks for stopping by!

Wednesday, September 28, 2016

Playing in the Garden

Anyone who knows me is laughing right now.  My extremely brown thumbs prevent me from doing much in a garden other than enjoying the beauty of it – if it belongs to someone else. Club Scrap must not have known that little fact because they still sent me my “Garden Shed” kit this month. I did have fun playing with this kit to make a set of eight cards (or two sets of 4…I haven’t decided yet) for the monthly Blog Hop and Linky Party.
I dug out my Assembly Line Cardmaking Idea Deck (Vol. 2) and a bunch of other fun supplies and spent some time playing. 

For the first four cards, I used the cutting formula from the Ace of Clubs card:
For the other four I used the cutting formula from the Ace of Diamonds card:
To keep this post short, I won’t bore you with the details, but I will tell you that all of the paper and the ribbon came from my Garden Shed Lite kit. Other supplies I used are:

**stencil from Club Scrap “Dahlia” and “Twin Tags”.

**stamps from Club Scrap “Dahlia” , “Weathered Florals”, “National Parks”, “Navigation” “Peacock”, “Transformations” and “Blossom”.
.
**Earth, Topaz and Spruce Club Scrap ink, and Distress Embossing ink.

**Forest Green Glimmer Mist (no longer available), Cornflower Blue Mica Spray and Golden Sleigh Bells Starburst Spray from Lindy’s Stamp Gang.

**Dreamweaver Pearlescent Embossing Paste (mixed with the Topaz and Spruce inks)

**Mustard and Butter Zing  embossing powder, Clear Gina K Designs Fine Detail embossing powder and Midnight Teal Lindy’s Stamp Gang embossing powder.

**Ocean Soul and Gold Lame Smooch Ink.

**Lucky Clover Distress Marker.

**”studs” from Simplicity (found at JoAnn, altered with Copic marker #YR23), bee and dragon fly brads and gems are from my stash.

DISCLAIMER - no living plants of any kind were harmed in any way during the making of these cards.

Thanks for stopping by!

Wednesday, September 14, 2016

Losing my marbles…not!

At first I wasn’t going to participate in this week’s Gina K. Stamp TV Challenge “Let’s Play with Marbles”. I had tried that technique a few years ago, and didn’t have any success with it. However, when I watch Gina’s video, I saw that she did it a slightly different way, so I thought I would try it again. I am so glad I did! Now I am a fan of the marble technique. I combined that with this week’s Mojo Monday sketch, #465 and came up with this:
Here are the supplies i used and some more details:

**paper is from Gina K. Designs (base) and Club Scrap.

**The marble technique was done using Evergreen Bough and Squeezed Lemonade Distress re-inkers.

**The focal image is stamped onto a scrap piece of cardstock that is colored with Squeezed Lemonade Distress Stain. The flower is from Gina K. Designs “Autumn Wishes” stamp set, stamped with Distress Embossing ink, and embossed with Zing’s Metallic Purple EP (flower), Lindy’s Stamp Gang’s Scotch Broom Yellow EP (center of flower) and Ranger’s Topiary Antiquities EP.

**The sentiment stamp is from Crafter’s Companion. It was stamped with Distress Embossing ink, and embossed with Zing’s Metallic Purple embossing powder.

**I used Evergreen Bough Distress Ink to distress the edges of the papers.

**The ribbon is from Club Scrap’s “Papillion” kit.

**The sentiment circle was cut out using Spellbinders dies.

**The “gems” are from my stash.

Thanks for stopping by!

Saturday, September 10, 2016

Celebrate Getting Older

I used the Mojo Monday sketch #464:
to make a birthday card for a friend of mine. After rotating the sketch, I came up with this:
I used up several “art orphans” and some paper scraps to pull this card together, but don't remember what or how the techniques were done. Here are the supplies I used:

**paper is from Gina K. Designs (base), Club Scrap, and I’m not sure where the scraps of glitter paper are from (but I altered the color using Copic Marker Y35).

**I used a background stamp from Technique Junkies on the middle layer.

**For the focal image I mixed Dreamweaver Embossing Paste mixed with a little Marshmallow Glimmer Mist (which doesn't seem to be available anymore) and spread it through a plumeria stencil from Rubber Stamp Plantation (onto an art orphan piece).  As I worked the paste through the stencil, it picked up color from the background giving it a golden yellow look.

**The ribbon is from the “BandanaRama” Club Scrap kit.

**The sentiment stamp is from the “National Parks” Club Scrap Kit. (On the inside it says “Life is better when you are laughing.”). It was stamped with Candied Apple Distress ink, and embossed with Gina K. Designs clear embossing powder.

**The “gem” in the middle of the flower is from my stash.

Thanks for stopping by!

Tuesday, September 6, 2016

It’s snowing?!?

I live in Hawaii, so you can rest assured that it is not snowing here, especially in early September! But, this week’s challenge over on Gina K’s Stamp TV is to make a Christmas card with snow on it. Here is what I came up with:
The focal image background is a new (to me) technique that I learned from Julie Ebersol on this video. I used Lagoon, Ocean and Orchid Club Scrap Re-Inkers. The tree, from the Gina K. Designs “Cheers Mini Stamp Set” (which doesn’t seem to be available anymore), is stamped with Distress Embossing Ink, embossed with Ranger’s Sticky EP and covered with silver leaf from ArtMinds (found at Michaels). The small snowflakes are (I believe) from Gina K. also (but I don’t remember which set) stamped with In The Navy Gina K. Designs ink.

Other supplies I used:

**paper is from Gina K. Designs (base), Ranger Specialty Stamping Paper (focal image), and Club Scrap (everything else).

**background snowflakes are from  Gina K. Designs “Christmas Joy” set, stamped with Distress Embossing ink, embossed with Silver Moon Turquoise EP from Lindy’s Stamp Gang.

**sentiment stamp is from Gina K. Designs "Season's Greetings" set, stamped with In The Navy Gina K. ink.

**the twine came from Club Scrap with my “Serenity” kit.

I wish snow for all of you who want it, but I’m looking forward to my “green” Christmas!

Thanks for stopping by!

Wednesday, August 31, 2016

Summer Sunflowers for Writing by Hand

August has just flown by! Of course, two trips in the first half of the month really helped to shorten the time. It took a while for me to figure out what to do for the Sunflowers Blog Hop & Linky Party. Then I had inspiration from two unusual resources. First, I was visiting my sister on one of my trips and found out that she like journals. Cool to know, but I just filed that info away in the future gift ideas folder. Next, after I got home, I heard an ad on the radio about the “BIC Fight for Your Write” campaign. Then it clicked. A journal is a great way to celebrate the dying art of good ole’ fashioned handwriting. So, here is my project:


All the supplies came from my Club Scrap Sunflowers Lite kit, with these additions: 
**Earth Club Scrap Ink to distress the cut-a-part on the cover
**Mustard Seed Distress Stain to alter the color of the outside binding and the inside cover paper
**some ribbon from my stash for a bookmark,
**regular copy paper and some left over waxed linen thread for the signatures.

I combined several different methods to put this book together, but got most of my inspiration from this video I found on YouTube, and this video of Tricia from Club Scrap (also found on YouTube). I also need to give a shout out to my friend Mary Beth for planting the idea of adding lines to the signatures. I did this by making two columns of underscore lines in a Word document with the narrowest of margins and printing them out on both sides (being careful to turn the paper the correct way when printing on the backside so the lines would be “lined up” on the paper).

I learned a couple of things while doing this project. First, it can be fun and rewarding to challenge yourself and push your own creative limits. Second, never give up! After a lot of planning and work, I was almost finished putting my journal all together when I made a major goof-up. I resisted the urge to first throw a tantrum, then throw the book out the window, and instead walked away from my desk for a little bit. When I went back, I studied what I had and looked for a way to make it work. This book may not match the vision I had in my head, but I am pleased with the way it turned out.

Thanks for stopping by!

Wednesday, July 27, 2016

Office Space Fun

It is that time of the month again…time for the Club Scrap Office Space Blog Hop! I had some fun, and went a little crazy this month:
I had planned to make the “office” related projects, then found out my son will be moving into a new place soon, and added a house warming gift for him. I’ll show you each piece and share a few details.

Project #1
I followed Tricia’s tutorial for a Business Card Holder.  All the supplies came in my Office Space Lite kit except the ribbon (which came from my stash, altered with Evergreen Bough Distress Marker), the die for the button closure (Die-namics), and the brad (from my stash). I also used Evergreen Bough Distress Ink on some of the edges, and a coat of Glue N’ Seal from Ranger to protect it all.

Project #2
I followed a Technique Junkies tutorial to make this Corner Bookmark . All the supplies came in my Office Space Lite kit except the ribbon (which was upcycled), the dies for the decoration (Spellbinders Circle and Spellbinders Floral Burst ), a border punch from Tonic Studios, some Tomato Soup Gina K Designs Ink, a drop of Rose Gold Liquid Pearls in the center of the design, and a coat of Glue N’ Seal .

Project #3
This project was inspired by a tutorial on the Splitcoast Stampers website. It started with a simple acrylic picture frame and a pad of post-it notes. All the other supplies came from my Office Space Lite kit except some Tomato Soup Gina K Designs Ink and some Earth Club Scrap Ink for edging, a button die from Die-namics , and some Glossy Accents on the coffee mug.

Project #4
This is the gift for my son. It started with an unfinished wood sign from my local Ben Franklin store. I stained it using Vintage Photo Distress Stain.  All the paper came from my Office Space Lite kit . The background pieces were embossed with a Tim Holtz Alterations (Sizzix) embossing folder, and inked with Ocean and Earth Club Scrap Ink . The tiki pieces were cut using a Die-Versions die and the color was altered with Champagne Glimmer Glaze (tiki faces), Earth Club Scrap Ink (behind the faces), Siren Smooch Ink (flowers), Safforn Glimmer Glaze (flower centers) and the Jade STA Metallic Pen that came in my kit (leaves). The “aloha” letters are a digital font from the Club Scrap Tahiti Digital kit that I printed out then fussy cut. The twine (from the kit) was altered with the Vintage Photo Distress Ink.  I finished with a layer of Glue N’ Seal over it all.

Thanks for stopping by!

Monday, July 25, 2016

The Waves of Change

It’s week 8 of the Summer of Creative Chemistry. This week’s challenge is to use both Distress Inks and Embossing Powder to create a project. My card was inspired by the honu (turtles) that I watch playing in the waves on my beach walks:
Here are the supplies I used and a few details:

**paper is from Gina K Designs (base) and Club Scrap.

**the background is the Brayered Stains Technique using Evergreen Bough, Broken China, Faded Jeans and Shabby Shutters Distress Stains.  I then stamped a “water” stamp from Seaside Stamping Ink using Faded Jeans Distress Ink.  Next I used a sponge ink tool to randomly swipe on some Distress Embossing Ink, sprinkled on some Ranger Sticky Embossing Powder and followed up with some Clear Rock Candy Distress Glitter after heating the powder.

**the turtle is a stamp from Club Scrap (Castaway), stamped with Distress Embossing Ink, embossed with Sticky embossing powder, then covered with copper leaf from Art Minds (which I found at Michaels) and fussy cut.

**the sentiment is also a stamp from Club Scrap (Transformations), stamped with Distress Embossing Ink, and embossed with Hyacinth Blue Jade powder from Lindy’s Stamp Gang. The sentiment card is also edged with embossing ink, sticky powder and covered with the copper leaf.

**both the background and the sentiment card were cut out using Deckled Retangles dies from Spellbinders.

**The ribbon is from Club Scrap (Boardwalk), altered with a Y11 Copic Marker.

**the brads are from my stash.

Thanks for stopping by!

Sunday, July 17, 2016

A Challenge with Alcohol…Inks

Who knew chemistry could be so much fun? Especially in the middle of summer? Of course, if my high school chemistry teacher taught me the "crafty kind" of chemistry, like Tim Holtz, and made it as much fun, I might not have slept through a lot of his class. 
The challenge for week 7 of Summer of Creative Chemistry is to do a project using alcohol ink. I am glad that I chose the Monoprint technique because I haven’t done it in a while and had forgotten how much fun it is. I made a card for my sister and brother-in-law’s 25th wedding anniversary:
Here are the supplies that I used:
**paper from Gina K Designs (base), Club Scrap, and Ranger Gloss Paper.

**Currant, Meadow, Denim and Silver Mixative Alcohol Inks.

**Jet Black Archival Ink.

**large tree stamp is from Club Scrap (Great Outdoors), smaller tree stamps are from I Break For Stamps (trees in valley, tree line). “Cheers” stamp is from Gina K Designs.

**Silver Club Scrap Ink, an old Creative Memories Precious Element gel pen, a Spellbinders die, and an old stencil from The Crafters Workshop were used for the sentiment tag (oh, plus a little of my own handwriting).

** A Fiskars Corner Edger (Blossom), which doesn’t seem to exist anymore, and ribbon from Club Scrap (Full Circle) were used to add extra interest.

Thanks for stopping by!

Sunday, July 10, 2016

“A Simple Hello” to Stencils

I LOVE stencils! There are so many cool things that you can do with them. I admit that I don’t push the limits a much as I could or should, but I am working on getting better. It was fun to have two challenges using stencils that I could combine into one project. The Summer of Creative Chemistry week 6 challenge is to use two stencil techniques (from Creative Chemistry 102, day two) together on one project. The Club Scrap July Technique Challenge is to “stamp through your stencil”. Here is my card:
I started with a stencil that was an extra for Club Scrap’s “Moroccan Spice” collection. I sponged on Topaz Club Scrap ink, then sprayed it with Yellow Daisy Glimmer Mist (which doesn’t seem to be available anymore). After tacking down ClubScrap’s “Dahlia” stencil, I sponged on Tangerine Club Scrap ink. The stamping part was done using a Club Scrap stamp from “Gratitude” and Carnation Club Scrap ink, meeting the the Club Scrap challenge, and the first technique for the Creative Chemistry challenge. Here is a close up of the flower to better show the image inside the stencil:
Next, while the stencil was still tacked down, I did the “Stencil Sketching” technique using a Abandoned Coral Distress Marker…technique number two. Then, just for grins, I went for a third technique and tried the “Embossing with Stencils”. My stencil didn’t quite stay in place, but it still added a little bit extra texture. I finished with one for spray of the Glimmer Mist to make the whole panel shimmer.

Other supplies I used:

**paper is from Club Scrap, and the sparkly mat is from my stash.

**sentiment stamp is from Club Scrap's “National Parks” kit, stamped with VersaMark ink and embossed with Midnight Emerald EP from LindysStamp Gang.

**ribbon is from Club Scrap’s “All That Jazz” kit.

**bling in the middle of the flower is from my stash.

Thanks for stopping by!

Sunday, July 3, 2016

Playing With Paint…

...Distress paint to be exact. I admit, that with all the crafty mediums out there, paint is not one of my go to choices. I only have seven colors of Distress Paint, so this week’s Summer of Creative Chemistry Week 5 challenge to use three or more colors of Distress Paint was extra interesting for me. However, I had a blast planning and playing with what I have. I ended up making a birthday card for my son:
I did the Distress Paint Marbling Technique for the background, using Black Soot, Brushed Pewter and Tarnished Brass Distress Paint.  I added a Pinking Circle die (from Taylored Expressions) cut out of a piece of silver velum, then dry embossed the whole thing using a Sizzix “Cracked” embossing folder.

The gecko is a die from Die-Versions.  He is cut out of Grungepaper, glued onto more Grungepaper and fussy cut out. I added a layer of Clear Rock Candy Distress Crackle Paint, then some Peeled Paint and Tarnish Brass Distress Paint.  Once it was all dry, I used a little Antique Bronze Distress Stain and some Black Soot Distress Ink to try to bring out the crackles and other details.

The green piece that has the sentiment on it was created from a scrap piece of black cardstock and the paints left over on my craft sheet after doing the background and gecko.  I just kept adding water, mixing it up, swishing the paper trough and drying it with my heat too.  The color slowly built up giving it a pretty cool looking texture when you see it up close.

Other supplies I used:

**paper is Gina K Designs (base) and Club Scrap.

**sentiment stamp is from Club Scrap “All That Jazz” kit, stamped with VersaMark ink and embossed with Silver Zing embossing powder.

**ribbon is upcycled, but altered with Brushed Pewter Distress Stain

**nail heads are from Mark Richards

**the layout for the card is loosely based on this last week’s Mojo Monday card sketch.

Thanks for stopping by!

Wednesday, June 29, 2016

No Shoes Please!

It is almost the end of the month, and that means it is Blog Hop Linky Party time over at the Club Scrap Blog.   This month I had a project in mind even before my Boardwalk Lite kit arrived. It all started with a trip to my local Ben Franklin store where I found this at a real good price:
My daughter recently moved to a new apartment which has carpeting. Her and her roommate decided to invoke a “no shoes in the house” policy to try to keep the carpet in good shape. My project is a house warming gift to help them get the word out to their visitors:
I won’t bore you with all the details of how this came together, but I will share a few highlights. (All the supplies came from my Boardwalk light kit except where noted.)  To start, I downloaded the Lobster font that Club Scrap used for this kit and printed out “welcome” on a piece of copy paper. After fussy cutting out the letters, I inverted them (because I didn’t think far enough ahead to invert before printing) to use as a template onto a piece of the navy paper and fussy cut them again. A couple coats of UTEE gave them a glassy look to blend in with the glass in the frame.

The “relax…” and “enjoy!” came from the Boardwalk stencil  included with my kit. They were stenciled onto a piece of the navy paper using Ranger Texture Paste which I colored with a few drops of Cloudy Blue Alcohol Ink. The “kick off you shoes” message was printed using the Lobster font onto part of one of the cut-apart journal cards from the kit.

I finished off the piece by staining the sides and back with Tarnished Brass Distress Stain, and by inking the front edges with Earth Club Scrap ink.

The flip flop stamp on the tag is from Stampendous. It was stamped with VersaMark ink embossed with Denim Zing EP, and colored in using Tumbled Glass, Candied Apple and Frayed Burlap Distress Markers.

Hopefully this will help my Daughter and her roommate keep their carpets in good shape.  (Or, at least brighten up their walls a little.)

Thanks for stopping by!

Monday, June 27, 2016

Birthday Agates

We are up to week number four of the Summer of Creative Chemistry!  The challenge this week is to create a project using Archival Ink. I combined that with Alcohol Inks and made a birthday card:
I started with the Alcohol Ink Agates technique using Sail Boat Blue, Citrus, Sunshine Yellow and Silver Mixative Alcohol Inks.  The background stamp, from Club Scrap (Time Of Your Life kit), was stamped with Jet Black Archival Ink.

The sentiment, from Club Scrap (Moroccan Spice Greetings Unmounted Rubber), was stamped with the same Jet Black Archival Ink onto a scrap of velum then embossed with WOW Clear Embossing Powder.

Other supplies I used:

**paper is Club Scrap.

**brads and ribbon are from my stash.

Thanks for stopping by!

Sunday, June 19, 2016

Perfect Chemistry

I am really enjoying the refresher of Creative Chemistry 101. Each week when I re-watch the videos I find little tidbits of information or techniques that I had forgotten about.  The challenge for week three of the Summer of Creative Chemistry is to use Perfect Pearls & Distress Inks or Stains.  Here is what I came up with:
The background started with a wash of Tumbled Glass, Evergreen Bough and Shabby Shutters Distress Stains, and edges inked with Evergreen Bough Distress Ink.  I stamped a Heartfelt Creations background stamp with Blueprint Sketch and Chipped Sapphire Distress Ink, then dusted it with Pewter Perfect Pearls.   The focal image was done the same way with the same supplies, then fussy cut out.  It is a Club Scrap stamp (I got it as an extra so I don’t know what kit it is from).

Other supplies I used:
**paper is from Gina K Designs (base) and ClubScrap.

**center image base is a die from Taylored Expressions.
  
**sentiment is a stamp from I Break For Stamps, stamped on a scrap piece of velum (brushed with a little bit of Pewter Perfect Pearls mixed with water) with Gina K Designs In The Navy Ink and embossed with Gina K Designs Clear Fine Detail EP.

**ribbon and bling are both from Club Scrap.

Thanks for stopping by!

Sunday, June 12, 2016

In Distress…Stains

It is another “one card for two challenges” post.  (I feel extra productive!)  This week’s Summer of Creative Chemistry challenge is to use Distress Stains and stamps.  June’s technique challenge over on the Club Scrap Blog is to create your own handmade embellishment. When I combined the two ideas, I came up with this birthday card:
The backgrounds are Faded Jeans, Broken China and Shabby Shutters Distress Stains on water color paper, with Salty Ocean Distress ink sponged on the edges.  Both layers are done the same, except a background stamp from Club Scrap’s Navigation Borders & Background stamp set was stamped with Brushed Pewter Distress Stain on the top panel. It didn’t create a detailed image, but I like the extra texture that it added.  I also used the same Distress colors on the sentiment banner with the Brushed Pewter “painted” over the top of them. 

For my handmade embellishment, I took a scrap piece of paper, coated it with VersaMark ink and covered it with Silver Zing embossing powder.  After repeating that process about four times, I stamped the image using a Club Scrap stamp from the “Artifacts” kit (be sure to use the VersaMark on the stamp before stamping into the warm embossing powder). I fussy cut it out, then rubbed a little bit of Black Soot Distress Paint on it to highlight the details a little more. I also made my own “nailheads” on the sentiment banner by punching out the dots using a small hole punch on some scrap black paper, then covering them with Glossy Accents after gluing them down.

Other supplies I used,

**paper from Club Scrap and Strathmore Water color paper.

**the sentiment is a stamp from Club Scrap’s “National Parks” kit, stamped with Onyx Black Versafine Ink and embossed with Gina K Designs Clear Fine Detail EP.

**the ribbon is from Club Scrap’s “Creative License” kit which I slightly altered with the Brushed Pewter Distress Stain.

Thanks for stopping by!

Wednesday, June 8, 2016

Monochromatic Birthday Card

Once I got around to really looking at this week’s Mojo Monday sketch
…the proverbial lightbulb light up. It has been awhile since something came together this quickly for me. I did tweak the sketch a little, but here is the finished birthday card:

The background is a technique called Faux Textured Metal Paper that I got from a Jennifer McGuire video. After using some Washi tape to mask the edges of the cardstock, I sponged on Weathered Wood, Stormy Sky and Hickory Smoke Distress Ink. Then I brushed on Pewter Perfect Pearls before removing the tape mask. The panel was then embossed using a Tim Holtz Alterations (Sizzix) embossing folder.

Other supplies I used:

**paper is from Gina K (Base), and Club Scrap.

**the clock is a stamp from Stampers Best (now Deep Red Stamps), stamped with VersaMark ink, embossed with Silver Zing EP and cut out with a Spellbinders Standard Circle die.

**the sentiment is stamp from Club Scrap’s “Time of Your Life” kit, stamped with VersaMark Ink and embossed with Club Scrap’s Hematite EP.

**the ribbon is from Club Scrap’s Cape Cod kit. 

Sometimes it is good to wander a little out of your comfort zone as I did with this card.  I normally use brighter colors, but since this is a card for my Brother-in-law, I think the blue/gray monochromatic feel works pretty well.

Thanks for stopping by!

Saturday, June 4, 2016

Creative Chemistry!

I’ll admit that I was not big on the science classes back in school, especially Chemistry. But, for some reason, taking a “Chemistry” class from Tim Holtz is way more fun and interesting! I am so looking forward to the Creative Chemistry 103 online class in August! In the meantime it has been good to go back an refresh the knowledge I learned from  CC101. Here is the card I made for the Summer Of Creative Chemistry Week 1 challenge:
The background was done with the “Spritz & Flick” technique using Mustard Seed, Mowed Lawn, Ripe Persimmon and Seedless Preserves Distress Ink. The edges were distressed with Black Soot Distress Ink.

The flowers were cut out of an art orphan that I finger painted, blending Seedless Preserves and Brushed Pewter Distress Paint.  I used Spellbinders – Heartfelt Creations “Daisy Patch” dies to cut them out, and a Stampers Anonymous “Croc” background stamp to add a little detail.  Each one was finished off with a Gold Jewel Dazzle sticker.

Other supplies I used,

**paper from Gina K (Base), Ranger Speciality Paper (background), and Club Scrap.

**the “hello” lattice was cut out using a Creative Expressions die.

**the ribbon was a piece left over from an old Taylored Expressions kit.

Thanks for stopping by!

Thursday, June 2, 2016

Two for One

I tied together two challenges today: the weekly challenge at Gina K’s Stamp TV which is to use black and white with a pop of color, and the Mojo Monday 450 card sketch challenge, which looks like this: 
I sprinkled in a bit of whimsy and came up with a card that looks like this: 
White is not my favorite color, and using a lot of it on a project is hard for me. To help me get past this, I sprayed a piece of white cardstock with both Iridescent Memories Mists and “Perfect Pearls” Perfect Pearls Spray to shimmer it up some. The sentiment stamp (from the Club Scrap “Adobe” kit) was stamped with VersaMark Ink, and embossed using  Zing "Mustard" EP. When it didn’t show up as much as I wanted it to, I put it back in my MISTI stamping tool (you really should check them out if you don't have one!!) and stamped it once more using "Onyx" Club Scrap Ink.  After hitting it with the heat gun again, it gave me almost a shadow effect and made the sentiment easier to read. Then I embossed it using a Spellbinders M-Bossabilities folder, doing it in stages so I wouldn’t emboss over the sentiment. 

The image stamp is from a Gina K stamp set duo called “Melt My Heart” which sadly doesn’t seem to be available any more. It was stamped with VersaFine ink, then embossed with WOW clear EP.  I colored in the scarf and hat using a "Fossilized Amber" Distress Marker, and I colored in the beak and feet using a Wild Honey Distress Marker that apparently is running dry. I liked the effect it gave though! I painted in the snowball and parts of the hat using a mixture of the two sprays (from the background). The banner was edged with the VersaFine ink. 

The other supplies I used are:

**paper from Gina K (base), and Club Scrap.
 
**the ribbon is from Club Scrap’s “Bon Apetit” kit (unfortunately no longer available) .

**the snowflake was cut out of a piece of black card stock that had been sprayed with the same two sprays as the background. The die is from Taylored Expressions.

**the little scrap of yellow on the side of the background was cut with wavy die from Stamps Of Life.  

Thanks for stopping by!